


The media could not be loaded.
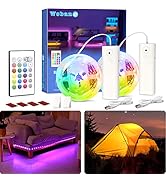
M means Manual mode. With Manual mode, you have to manually press an on/off switch on the sensor box to turn the lights on or off. The lights stay on until you turn them off, no motion or light sensing. This mode runs down the battery faster, so it will need recharging more frequently if you use Manual mode. A means Automatic mode, which is the light and motion sensor mode. The lights turn off automatically after about 30 seconds of no motion detected. This mode is more battery saving.
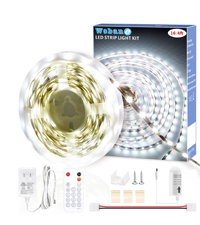
I bought the 16.4 foot long light string, after measuring my stairway. It has two sensor boxes (which sense both motion and light level), which you attach to the wall with magnetic strips. It's easy to unplug the sensor box and pull it off the magnetic strips to recharge it with a standard Android cable. Something that was not clear from the description of the product is that there is (for the 16.4 foot long model) one light string and each end of the string has a sensor box.
The one con is that the instructions that come with it are VERY lacking. There are some parts that come with it and the instructions don't explain at all about these parts and what they are for. I had to figure it out on my own.
So, I will try my best to explain the parts to you. There are some little circular stickers. These stickers are for covering the light sensor pinhole to convert the sensor box into a motion detector only, so that it only detects motion without regard to light levels. This means it will always trigger from motion no matter what time of day it is and how much light is coming in.
There are 2 cable clips to attach the bit of cable that comes from the sensor box to the wall.
There are 2 sets of wires that are red and black and have plastic bits at the ends. This one took me a while to figure out. It turns out to be a connector piece. The LED light strip has little black lines at intervals along the strip. These black lines mark where it is safe to cut the strip to make it shorter, without ruining the conductivity of electricity through the strip, so that it will still light up after being cut shorter. You cut exactly on the black line with your scissors. I did not need to cut my light strip, it was left intact, so I did not need to use these connectors. The connectors are for reconnecting the two parts of the light strip if you change your mind and want to reunite the cut sections. The way it works is you pry open the plastic clamps at the ends of the connector wires - this can be difficult to do, but I managed to do it with my fingernail. I suggest using a small flathead screwdriver instead of your fingernail, it's easier that way. Then after you've got it pried open, you lay the cut end of the light strip in it and then close the clamp over the cut end. Do the same for the other side of the connector, and then you've got the LED strips reunited and working as a single piece again.
I hope this review helps you make a decision about whether this product is right for your needs. I highly recommend it.


