My understanding of web scraping is patience and attention to details. Scraping is not rocket science (deep learning is). When I do scraping, I typically spend 50% of my time in analyzing the source (navigate through HTML parse tree or inspect element to find the post form) and the rest 50% in ETL. The most useful tools for me are requests, bs4 and re. Some people may recommend selenium for non-static website. To be honest, I have never used selenium throughout my career, but dynamic websites like Facebook and Twitter are still within my grasp. You see? patience and attention to details matter.
This repository contains a couple of python web scrapers. These scrapers mainly target at different commodity future exchanges and influential media websites (or so-called fake news, lol). Most scripts were written during my early days of Python learning. Since this repository gained unexpected popularity, I have restructured everything to make it more user-friendly. All the scripts featured in this repository are ready for use. Each script is designed to feature a unique technique that I found useful throughout my experience of data engineering.
Scripts inside this repository are classified into two groups, beginner and advanced. At the beginning, the script is merely about some technique to extract the data. As you progress, the script leans more towards data architect and other functions to improve the end product. If you are experienced or simply come to get scrapers for free, you may want to skip the content and just look at available scrapers. If you are here to learn, you may look at table of contents to determine which suits you best. In addition, there are some notes on the annoying issues such as proxy authentication (usually corporate or university network) and legality (hopefully you won't come to that).
1. HTML Parse Tree Search (CME1)
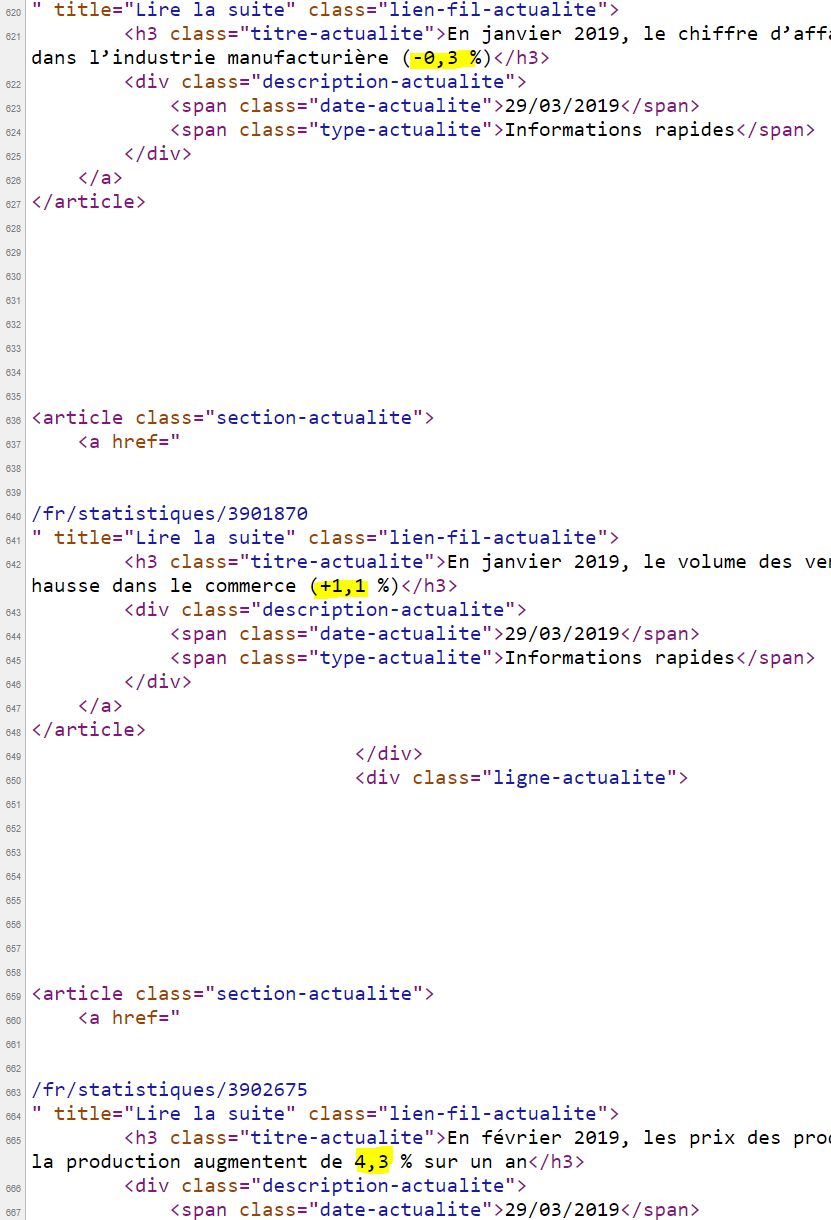
Tree is an abstract data type in computer science. Now that you are a programmer, Binary Tree and AVL Tree must feel like primary school math (haha, I am joking, tree is my worst nightmare when it comes to interview). For a webpage, if you right click and select view source (CTRL+U in both IE & Chrome), you will end up with a bunch of codes like this.
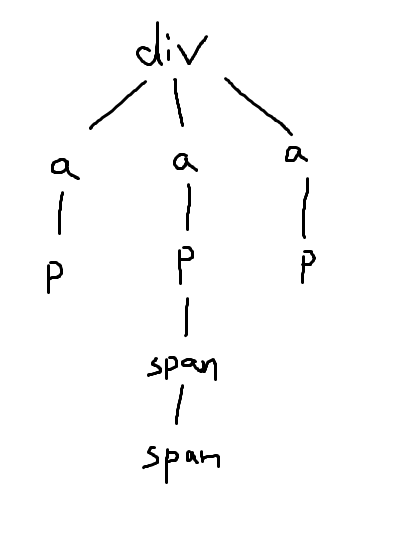
The codes are written in HTML. The whole HTML script is a tree structure as well. The HTML parse tree looks like this.
There is something interesting about HTML parse tree. The first word after the left bracket is HTML tag (in tree structure we call it node). In most cases, tags come in pairs. Of course, there are some exceptions such as line break tag <br> or doc type tag <!DOCTYPE>. Usually the opening tag is just tag name but the closing tag has a slash before the name. Different tag names represent different functionalities. In most cases, there are only a few tags that contain information we need, e.g., tag <div> usually defines a table, tag <a> creates a hyperlink (the link is at attribute href and it may skip prefix if the prefix is the same as current URL), tag <img> comes up with a pic (the link is hidden in attribute src), tag <p> or <h1>-<h6> normally contains text. For more details of tagging, please refer to w3schools.
It is vital to understand the basics of HTML parse tree because most websites with simple layout can easily be traversed via a library called BeautifulSoup. When we use urllib or other packages to request a specific website via python, we end up with HTML parse tree in bytes. When the bytes are parsed to BeautifulSoup, it makes life easier. It allows us to search the tag name and other attributes to get the content we need. The link to the documentation of BeautifulSoup is here.
For instance, we would love to get the link to the quiz on Dragon Ball, we can do
result.find('div',class_='article article__list old__article-square').find('a').get('href')or
result.find('div',attrs={'class':'article article__list old__article-square'}).find('a').get('href')Here, result is a BeautifulSoup object. The attribute find returns the first matched tag. The attribute get enables us to seek for attributes inside a tag.
If we are interested in all the titles of the articles, we do
temp=result.find('div',class_='article article__list old__article-square').find_all('a')
output=[i.text for i in temp]
or
temp=result.find('div',attrs={'class':'article article__list old__article-square'}).find_all('a')
output=[i.text for i in temp]
The attribute find_all returns all the matched results. .text attribute automatically gets all str values inside the current tag. The second article has a subtitle 'subscriber only'. So we will have a rather longer title for the second article compared to the rest.
You can refer to CME1 for more details. Please note that CME1 is an outdated script for Chicago Mercantile Exchange. Due to the change of the website, you cannot go through HTML parse tree to extract data any more. Yet, the concept of HTML parse tree is still applicable to other cases.
JSON, is the initial for JavaScript Object Notation. Like csv, it is another format to store data. According to the official website of JSON, it is easy for humans to read and write. Pfff, are you fxxking with me? Anyway, an SVG image generated by D3.js is normally associated with JSON data. Finding JSON makes it possible to extract data of an interactive chart. If you open JSON with notepad, you will see something like this.
Gosh, the structure is messy and I will have a panic attack very soon. Duh! Just kidding. If you are familiar with adjacency list in graph theory, you will find it very easy to understand JSON. If not, do not worry, JSON is merely dictionaries inside dictionaries (with some lists as well). To navigate through the data structure, all you need to know is the key of the value.
Reading a JSON file in Python is straight forward. There are two ways.
There is a default package just called json, you can do
import json
with open('data.json') as f:
  data = json.load(f)
print(data)
Nevertheless, I propose a much easier way. We can parse the content to pandas and treat it like a dataframe. You can do
import pandas as pd
df=pd.read_json('data.json')
print(df)
Reading JSON is not really the main purpose of this chapter. What really made me rewrite the scraper for CME is the change of website structure. In April 2018, I could not extract data from searching for HTML tags any more. I came to realize that CME created a dynamic website by JavaScript. The great era of BeautifulSoup was water under the bridge. At this critical point of either adapt or die, I had to find out where the data came from and develop a new script. Guess where?
The URL is still in page source! The HTML tag for the hidden link is <script>. As I have mentioned at the beginning of this README file, scraping is about patience and attention to details. If you try to search all <script> tags, you will end up with more than 100 results. It took me a while for me to sniff the data source. My friends, patience is a virtue.
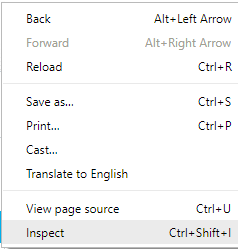
As for other websites, we may not be that lucky. Take Euronext for example, you won't find any data in page source. We have to right click and select inspect element (CTRL+SHIFT+I in Chrome, F12 in IE).
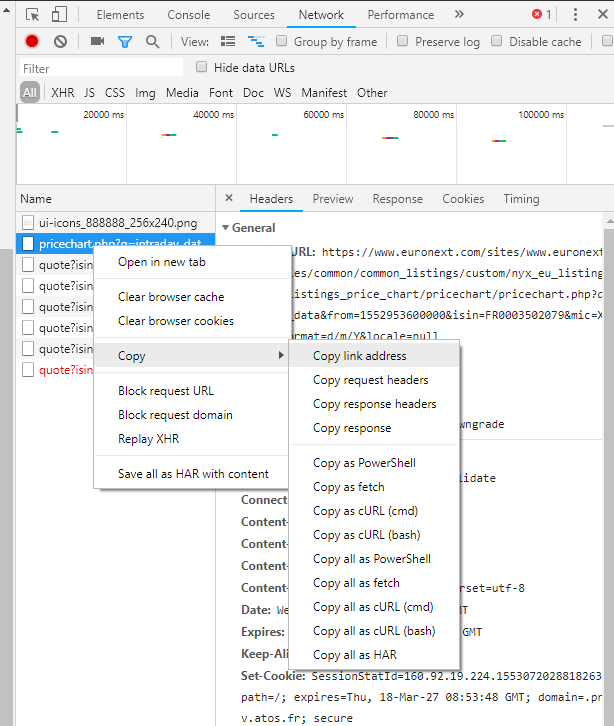
The next step is to select Network Monitor in a pop-up window. Now let's view data.
There is a lot of traffic. Each one contains some information. Currently what truly matters to us is the request URL. Other information such as header or post form data will be featured in a later chapter. We must go through all the traffic to find out which URL leads to a JSON file. Once we hit the jackpot, we right click the request and copy link address.
Voila!
Euronext is still considered an easy one. Sometimes you have to post a form with valid header to get the JSON file. You will see that in the first chapter of advanced level. For more details of JSON, feel free to take a look at CME2. Please note that CME2 has replaced CME1 to be the available scraper for Chicago Mercantile Exchange. There is also CME3 which specializes in option data.
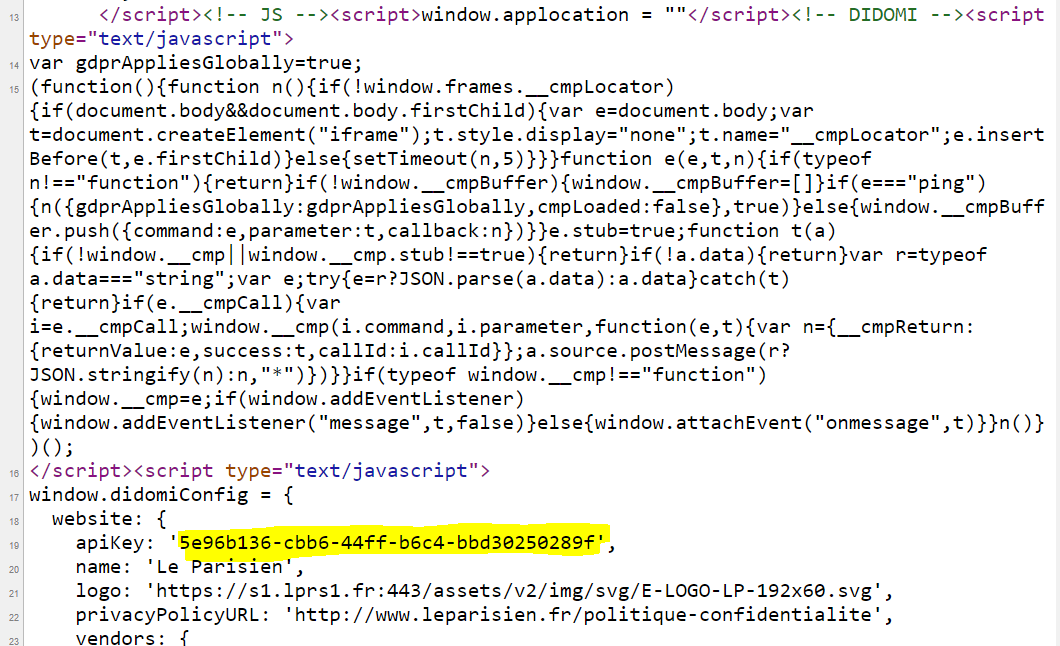
Sometimes, navigate through HTML parse tree may not get you what you need. For instance, you have some information inside a javascript function. You don't really want the whole bloc. All you care about is API key.
Or you got multiple titles. You only care about the numbers inside these titles. You are unable to use array slicing with indices because numbers don't appear in fixed positions. Those numbers can even be negative.
Helpless, right? Not if you know regular expression! We will call it regex in the following context. Think of regex as another simple language as HTML. In Python, there is a built-in library called re. There are a couple of functions inside this module. But for web scraping, re.findall and re.search are commonly used. re.findall returns a list of all the matched words and re.search returns a regex object. We simply apply attribute re.search('','').group() to concatenate the text together.
As for the regex itself, there are a few useful tips. (?<=) and (?=) are my favorite pair. They are called look-ahead and look-behind. If the content you are looking for is always behind a comma and before a question mark. You can simply do
(?<=\,)\S*(?=\?)Punctuation marks have special meanings in regex. If you need to specify comma instead of special meanings, you always remember to put a slash before it. \S* refer to all the non-whitespace characters. Characters have no special meanings in regex. But when you put a slash before characters, all of sudden they have special meanings, quite the opposite to punctuation marks.
The full table of my useful tips is here.
| Syntax | Meaning |
|---|---|
\d* |
All the numbers. If we remove asterisk mark, we will only match one digit. Asterisk mark refers to zero or multiple occurrence. |
\w* |
All the characters, numbers and underscore marks |
\S* |
All the non-whitespace characters |
-?\d*\,?\d* |
All the numbers, potential negative signs and potential commas. Question mark means the character can be zero or one occurrence. |
\d{4} |
4 digits |
^Tori |
Anything starts with Tori |
Black$ |
Anything ends with Black |
[a-z0-9] |
Anything involves lower case characters or digits |
[^A-Z] |
Anything except upper case characters |
(?<=\,)\S*(?=\?) |
Anything behind a comma and before a question mark |
You can check w3schools for more details on regex syntax.
In this chapter, the example is to navigate through a JSON file by regex (way faster than parsed as a pandas dataframe). Recalled from the previous chapter, JSON file is sort of dictionaries inside dictionaries. Normally we access the value by multiple keys. If you think of JSON file as a tree ADT, we need to know every node (key) from root to parent to go to the child node (value). Now we convert the whole structure to string and search for certain patterns via regex. With look-ahead and look-behind pair, knowing a parent node is fairly sufficient to get the value. Don't believe me? Feel free to take a look at SHFE for coding details.
Congrats! I assume you have mastered entry-level web scraping. Since we come to more advanced level, we will have to deal with more complex issues. In this chapter, we will talk about how to sign into a website in Python. Please bear in mind that we will only discuss login without any captcha or other Turing Test (google's reCAPTCHA is one of the worst). It doesn't mean captcha is the dead end for scraping. There are two ways to bypass captcha, manually downloading image for human recognition or using external package to do image recognition. You will find something here.
Well, login is no magic. Traditionally it is posting a form consists of critical information to a certain address. When each piece of information matches the record in website backend database, the website will assign a token to you. Token is like security clearance. It enables you to visit the content that requires login. Always remember to insert a token into the header when you got one after authentication.
Big companies like Facebook or Twitter use a slightly different approach called CSRF token. The website sends a token to you before sign-in. It goes without saying that CSRF token must be presented at login. There will be no more token assigned to you after authentication because the cookies will take care of everything. Think of CSRF as buying TTP in Madrid, once you tap it on the card reader to pass the gate, you do not need it to visit any station or exit the metro system.
Let's look at a simple case, a website called CQF. This great website features many free reports and videos on quantitative finance. But, there is always a but, the annoying part is resources are exclusive to registered users. Thus, we will be forced to include the login part in our python scraper. As usual, we always take a quick look at the website before coding. When we log in, we need to inspect element to seek for the login activity (if you forget how to do this, please refer to chapter 2 in the beginner level). There are quite a few activities when we log in, right? The quickest way to distinguish the login from the rest is to search your username and password. Because username and password are normally unhashed.
Now that we have located the login activity, there are three key things we need to keep an eye on. The first one is Request URL. It will be the URL we post our form to. Pay attention to Request Method. The login is often POST method, rather than GET method.
The second one will be Request Headers. Headers are great tools to disguise your scraping as an internet browser. They are called headers because you would spend most of your time scratching your head to get them right. We can observe tons of information in the headers. Only a small bit of them are genuinely useful to the login. An effective way is to exclude cookies and anything contains hashed information. Nonetheless, this is not always the case. Some websites filter out machines by valid cookies with hashed information for login. If you accidentally exclude those headers, you may trigger the alarm of the website and end up with some form of captcha.
My apologies for the redaction in these headers. The redaction plays a vital role here to protect my privacy. It turns my headers into some confidential documents from MI6.
The last but not least one will be Form Data. It contains the critical information for authentication, such as username and password.
There is another part called Query String Parameters. We do not encounter it very often at login. It is more frequently seen in data query though.
Once we have gathered everything we need, we can simply do
session.post(url,headers={'iamnotarobot':True},
             data={'username':'lanarhodes4avn',
                   'password':'i<3ellahughes'},
             params={'id':'jia.lissa'})
The session will automatically update its cookie after posting a form. Generally speaking, the website gives a token in return (CQF does not). And the response is likely to be in JSON format, then we do
session.headers.update({'token':response.json()['token']})We have obtained the security clearance now. We can snoop around every corner as we please. Quite simple, isn't it? For more details, feel free to click CQF. If you crave for a bigger challenge, why don't you start with scraping a private instagram account?
Why do we need database?
There are many reasons for a big organization. For an individual user like us, the biggest advantage is, EFFICIENCY. Assume a website publishes data every day and you need consistent time series to run some models. For economic reasons, we only need to scrape the latest report each day in theory. What if one report gets delayed by some 'technical issues' (usually this is a lame excuse)? We have to scrape two reports next day. But we cannot keep track of everything every day and machines are supposed to do the grunt work for us. If we scrape the entire historical dataset as an alternative, it will take too much time and computing capacity. Additionally, we are running a risk of being blacklisted by the website. Some of those APIs even implement daily limit for each user. This is when database kicks in and keep tracks of everything. With records in the database, we can always start from where we left off last time. Of course, there are many other benefits of database, e.g. Data Integrity, Data Management. Enough of sales pitch, let's get into the technical details of database. The package we installed is called sqlite3, referring to SQLite database. The setup of SQLite database is hassle-free, in contrast to other relational database such as MySQL or PostgreSQL. Other benefits of SQLite include rapide execution, petit size. Since we are not running a big organization, we shouldn't be bothered with things like Azure, SQL server or Mongo DB.
To create a database, we simply do
conn = sqlite3.connect('database.db')
c = conn.cursor()
The above command would create a database if it does not exist in a given directory. If it exists, it will automatically connect to the database instead.
If you are connecting to corporate server, you might consider the following tutorial on pyodbc. To connect to SQL server, simply do
import pyodbc
conn = pyodbc.connect('DRIVER={SQL Server};SERVER=some_ip_address;DATABASE=some_database_name;UID=some_username;PWD=some_password')
c = conn.cursor()
Next step is to create a table in the database, we can do
c.execute("""
          CREATE TABLE table_name
          ([column1] DATATYPE, [column2] DATATYPE, [column3] DATATYPE,
          PRIMARY KEY ([column1], [column2], [column3]));
          """)
conn.commit()
Some key notes
- An interesting feature of SQL is its case insensitivity. Still, the upper case letters make things more distinguishable. The brackets
[]serve the same purpose. - For some reason, sqlite3 requests
;at the end of each SQL command. - Always remember to commit changes to database. Think of it as a pop up window to ask you if you want to save all the changes and you click HELL YEAH.
- The data types in SQL are very sophisticated and precise. Unless your duty is to maintain the efficiency of the database, I'd suggest you go with python data types such as 'FLOAT','DATE','TEXT'.
- Primary key is crucial to your data integrity. Primary key guarantees the uniqueness of the datasets. For instance, if the website modifies one historical data point, without the primary key constraint, we could end up with two values for the same period. With the primary key constraint, we can update the old value to skip any data corruption.
- Only one primary key is allowed in each table (or no primary key at all). Even though, primary key can involve multiple columns, like the above statement.
Now that tables are set up, let's insert some scraped data into the database, we can do
c.execute("""INSERT INTO table_name VALUES (?,?,?,?)""",[data1,data2,data3,data4])
conn.commit()
conn.close()
We should not forget the last statement. SQLite3 database does not allow multiple modification at the same time. Other users cannot make changes inside the table if we don't close the database, similar to Excel in a way.
To make query directly from database, we do
c=conn.cursor()
c.execute("""SELECT * FROM table_name WHERE [column1]=value1;""")
rows=c.fetchall()
conn.commit()
The above is a conventional query method in sqlite3. However, pandas provide a much more convenient way. The output goes straight into dataframe instead of tuples within a list. Easy peasy lemon squeezy!
df=pd.read_sql("""SELECT * FROM table_name WHERE [column1]=value1""",conn)One of the very common issues from query is encoding. Unfortunately, I haven't managed to solve it so far. Though there is a way to get around like this
'C\'était des loques qui se traînaient'.encode('latin-1').decode('ISO-8859-1')There are other useful SQL sentences as well. For more details, you can check w3schools. I personally believe fluency in SELECT, DELETE, UPDATE and INSERT is enough to cover most of your daily tasks, unless you aim to be a data architect dealing with numerous schemas.
Some other useful statements including
UPDATE table_name SET [column1]=value1
DELETE FROM table_name WHERE [column1]=value1
Feel free to take a look at LME for more coding details.
These days we receive endless bombing of newsletter both in work email and private account. Ideally, a newsletter provides you with vital and concise information to make important decisions. It’s one of the greatest end products of web scraping. Unfortunately, most of the newsletters these days merely have one objective, tapping into your inner fear of missing out. You know what? It’s time for us to show those scumbags how a great newsletter is properly done!
Everyday shit happens. For someone who tracks the petroleum industry in Middle East and North Africa region, what’s the best way to keep up with the latest information? Here, we create a newsletter for the analysts who crave for market intelligence. The newsletter consists of scraping, updating, filtering and presenting. The initial stage is to scrape the news from influential sources that covers MENA region including BBC, CNN, Wall Street Journal, Financial Times, Reuters, Bloomberg and Al Jazeera. As we have gone through HTML tree, JSON searching and regular expression in the earlier chapters, this should be a walk in the park for you now. The second stage is to create a database. Since we want the latest update, not some information we have read yesterday, we need a database to keep track of the outdated information. We can simply use insert command to filter all the outdated information which is the topic we have covered in the previous chapter. All the outdated information would fail the inserting process due to the no-duplicate constraint. Everything being inserted will also go into the newsletter. The third stage, filtering the useful information, is beyond the scope of web scraping. How do I apply the degree centrality to prevent information overload? You can read it from the repository of graph theory. The fourth stage, presenting your newsletter, is what this chapter is centered around.
There are two parts of the presenting, backend and frontend. Frontend is a lot simpler in terms of codes. A nice and comprehensive frontend is all about design. There are plenty of HTML email templates you can borrow ideas from, e.g. Stripo. After you obtain the information from database inserting and algorithm filtering, you can embed the information into HTML. The only tricky part is to include the image. There are a few ways to do that.
-
Use the link of the image. This is highly recommended. Although it may be a little bit slow to load the image from the internet, it’s the most efficient way. The downside is that images are not loaded by default. The recipients need to click download image button.
-
Attach the image. Once all images are attached, we can add
<img src='cid: imagename.jpg'>into HTML email. The image will be faster to load but the email definitely takes a longer while to send and receive. Another faux pas is that the script is likely to suffer from a performance issue. We have to scrape the website repeatedly to download images. -
Paste the raw content in the format of base64. Add
< img src='data:image/jpg; base64, [remove the brackets and paste base64]'/>into HTML email. Blocked by most email clients including Outlook is its big malaise.
Compared to frontend, the backend is usually a pain in the ass. Backend developers don’t take credits for flawless operation, but when things go south, they are always the cannon fodder 😟 After you put everything clean and tidy into HTML email, you don’t want to launch your email client and click the send button. C’mmon, we are programmers. We can do better! There are a few ways to achieve the goal as well. My preferable choice is win32. This package allows you to control Microsoft applications through COM API. You can control outlook via Python as long as the email terminal is active in the background. The detailed commands can be referenced from mailitem object model in Microsoft Developer Network. If you are a user of Windows 10 Pro, your outlook autoruns at startup. This seems to be the most straight forward choice. Alternatively, there is a library called smtp for configuring POP3/IMAP server. I suppose the authentication of your email account would be a big hassle.
With the blessing of web scraping, we eventually reduce click click click to pressing F5 in a Python IDE. Here is one final piece of the puzzle to turn your workstation into a server. The magic is called task scheduler (this is a showcase for Windows not sure Mac OS has the same thing). Task scheduler can automatically perform routine tasks at whatever criteria you set and then execute the tasks when triggered. You can run python directly in task scheduler with the script path as your argument. Here I prefer a BAT execution file which is more acceptable in a corporate network environment.
Regardless of which way you pick, you need to find out where your python is installed. This can be easily done via where python in the command line.
If you would love to directly call python.exe, you can skip the following procedures straight to the final step. Otherwise, you need to create a BAT execution file in notepad. Just specify the path to python.exe and the path to the script you want to automate.
When you save the file, remember to use the extension of bat instead of the default txt and change the file type to All Files.
To launch task scheduler, you only need to search it in the start menu.
Let’s start a basic task from the right-hand tab.
Just type in whatever name and description you want.
Then select the frequency, in our case, daily.
We can set the beginning of the execution, the time of the execution and how often the action recurs. It even allows you to synchronize the operation across different time zones. Use it especially if you are a technology consultant who frequently travels.
For some unknown reasons, task scheduler has deprecated the choice of automatically sending an email. We can still achieve the same result via win32 in Python, just to create a fabricated persona of a workaholic who sends midnight email to boss 😒
Finally, we should input the path to BAT execution file. You can use the path to python as well. Then the path to the script is required as the argument.
Felicitations, c’est fini 😶
You can edit or delete your task from clicking the library tab.
As you can see, newsletter is not just some gibberish promotion email from Ocado. It can be used to optimize your information process as well. What kind of power a newsletter can harness is entirely up to you!
For more technical details, feel free to check out MENA Newsletter.
Proxy, it has always been associated with censorship. It is commonly used to access the websites blocked by some parties (e.g. governments) or it is enforced by some parties (e.g. corporates) for the purpose of surveillance. Either way, it is against liberté. Yet, it's not my place to make a moral judgement. For whatever reason to use proxy, the authentication can become a huge pain in the ass. I have literally spent hours scratching my head to figure out why my code doesn't work. Here are a few key points to make our life easier.
It goes without saying how important proxy URL is. Protocol is usually http but occasionally https. Domain could be a bunch of number (e.g. 192.168.1.1) or a normal one (e.g. myproxy.com). As for the port, it can only be numbers (e.g. 8080).
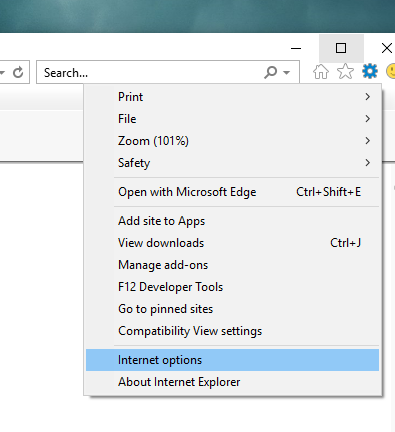
If you don't have URL information, you can always try to check Local Area Network Settings. Assuming you are using Windows, you can go to internet options in IE (in windows 10, you can find it in Windows Settings - Network & Internet - Proxy)
Click connections on the top panel then click LAN settings
You could find the proxy setup here
If not, you have to contact your local IT administrator. Sometimes python may be going through proxy by default. We could pass empty dictionary to session.proxies to get things working.
Once we obtain the proxy URL, we can do
session.proxies={'http':'http://domain:port'}Proxy commonly requires authentication. The package we are using offers three types of authentication, HTTPBasicAuth, HTTPDigestAuth and HTTPProxyAuth. For simplicity, we just do
session.auth=requests.auth.HTTPProxyAuth('username',
'password')Given correct username and password, you still get TimeoutError thrown to your face? Or what exactly is this SSLError? You are not alone! I have been hung out to dry for days simply because I neglect the role of certificates. The library requests provide two types of certificates, SSL and client side. They are both handy to use. For client side certificates, we can do
session.cert='path/proxy.cer'For SSL certificates, we can do
session.verify='path/proxy.cer'If you don't know where to find certificates or your IT administrator does not cooperate, additionally, there is a dangerous shortcut. We simply disable SSL verification at the risk of man in the middle attack (by raising this issue, your IT admin shall comply, it works every time 😏 ). There is also a tool called CNTLM that helps.
session.verify=FalseNow we can harness the power of web-scraping!
session.get('https://www.lepoint.fr/gastronomie/')The purpose of web scraping is to extract online data in a large scale by automation. Nevertheless, some of the website content may be under copyright protection called Digital Millennium Copyright Act (even pornography is protected by DMCA). This adds a little complication to our projects. Even open source data is subjected to fair use, yet the interpretation of fair use is always trivial. There have been many lawsuits around web scraping. Sometimes the scrapers lose sometimes the scrapers win. The actual verdict varies case by case. Law is equal to anyone. Except those with deep pockets are more equal than the others. Nobody really wants to be that sucker who pays the fine. I am not licensed to offer any practical legal counselling but I do have a couple of useful hints for you.
In most cases, you can find terms of web scraping in the declaration of the content rights or other similar legal sections. These terms are long, sophisticated and incomprehensible (insert the joke here, can you speak English 😁 ). The most straightforward way is to add /robots.txt behind any website domain. You will find out the policy set by the website administrator. Usually it tells you what the restrictions are.
For instance
https://www.lemonde.fr/robots.txt
In English, all user agents (* refers to all) are allowed for the following 2 sub directories.
/ws/1/live/*
/ws/1/related_content/*
But forbidden for the following directories
/ajah/
/api/
/beta
/cgi-bin/ACHATS/
/element/commun/afficher/
/petites-annonces/
/qui-sommes-nous/
/txt/
/verification/source/*
/noscript/
/ws/*
/recherche/*An ethical way to do web scraping is to pause your request from time to time. Using distributed web scrapers, the algorithms send requests much faster than clicking website in a web browser. Some of the small websites could encounter server overload and service shutdown. If you are being too aggressive, you might trigger an anti-abuse system. Usually it results in IP address blocking, perhaps temporary for a few hours or days, unlikely to be permanent. In worst cases, your scraping could be identified as DDoS attack. State sponsored hacking groups normally launch these sorts of attacks. These attacks are serious offense under Computer Fraud and Abuse Act. You could be convicted in criminal cases and end up in jail. Hence, there is no harm in waiting for a few extra seconds to disguise as a human viewer.
In Python, we just do
import time
import random as rd

time.sleep(rd.randint(1,5))Thanks to European Union, now we have General Data Protection Regulation. Apart from GDPR, California is about to roll out California Consumer Privacy Act. This brings challenges to the thriving business of data broker. Ideally most of us build web scrapers to scrape open data source. If you are scraping résumé from LinkedIn or stalking someone on social media, and the person is fallen under the jurisdiction of European Court of Justice, then it will be tricky. Is it considered obtaining and processing personal data without someone's consent? I can't tell. As a consumer, I fully support the regulation safeguarding my personal data. As a coder, I would've recused myself from building a web scrapper with potential violations.
Last but not least, if there is API which implies it is legitimate, always use API instead of building your own toolbox. Why reinvent the wheels and bear the risks?
