SlideShare a Scribd company logo

1

Hands On Lab: BlackBerry WebWorks Bootcamp
                  Alan Wong
              alawong@rim.com
              February 26, 2011

2

TODAY’S GOAL
Building an application using the BlackBerry WebWorks App Platform

3

Setup


• This lab will use the following developer tools:
   – Oracle Java Development Kit (JDK) version 1.6
   – BlackBerry WebWorks Packager version 1.5
   – BlackBerry WebWorks Plug-in for Eclipse version 2.5


• Lab Sample Code
   – Starter and Solution Files Source Code
        • Images, HTML + CSS + JavaScript
   – Available on site

4

First Steps: Create a New Project


 • Open Eclipse
    – Optional: Create a “blackberry” workspace
    – Optional: Open BlackBerry Web/Widget
      Perspective


 • Create a new BlackBerry WebWorks Project
    – File  New  BlackBerry Widget Project
    – Name the project “MyFirstApp”


 • Start a new debugging session
    – Packages and launches application in
      Smartphone simulator

5

Your First WebWorks Application

6

UI – Add Visual Resources


 • Keep Simulator Open
 • Back to the MyFirstApp Project in Eclipse
 • Add Images to the project:
    1.   Create “img” folder
         • Right Click Project  New  Other …  General  Folder  “img”
    2.   Import images from Lab Samples Folder
         • Right Click “img” folder  Import  General  File System
         • Browse to <lab samples folder>/ img
         • Select all images and Import

7

UI - Adding Application Details

• Open the WebWorks Configuration file (config.xml)
   1.   Add application details:
        • Version – “1.0.0.1”
        • Description – “This app was created using BlackBerry WebWorks”
        • Author & Email & Copyright – your name & email & “2011”

   2.   Click Browse button next to Loading Screen  Foreground Image
        • Select the loading.png image
        • Enable “Show on First Launch” and “Show for Local Pages” checkboxes
        • Choose any “Transition Effect” from the “Type” drop down box
        • Set Background Color #: “92CD00”

   3.   Click Browse buttons next to Widget Configuration  Icon/Hover Icon
        • Select the homescreen.png image

8

UI - Adding Application Details

9

Application Details - Preview


 • These changes affect how your application appears on the
   BlackBerry Home Screen and System:

10

Building Blocks of a WebWorks Application


 • HTML
    – Use HTML to create the structure of a screen
 • CSS
    – Use CSS to apply a theme / style to your application
 • JavaScript
    – Use JavaScript to add functionality in your application


 • Index.html
    – By default a WebWorks application loads this page as its starting point
    – Initial launch page can be overridden in config.xml

11

Step 1: Add HTML


• Add HTML files to the MyFirstApp project
   1.   Right Click Project  Import  General  File System
   2.   Browse to Lab Samples folder
   3.   Select all HTML files:
        • index.html
        • feedback.html
        • selections.html
   4.   Click Finish to import all of these files into the project
   5.   Overwrite index.html file
• Start debug session to preview changes

12

Step 1: Add HTML - Preview

13

Step 2: Modify HTML


• Lets add some missing pieces
• Open index.html and feedback.html and selections.html
   – Remove borders from all tables
<table style="width:100%;" cellspacing="0"
          cellpadding="0" border="0">

   – Replace five image placeholders with corresponding <IMG> tags
       • Top:    Left = User.png;   Right = Selections.png
       • Bottom: Left = Feedback.png;   Middle = Calendar.png;   Right =
         Messenger.png

 <td id="shareIcon">
      <!-- Add image here: img/user.png -->
      <img src="img/user.png" class="imgIcon"/>
 </td>

14

Step 2: Modify HTML - Preview

15

Step 3: Add CSS


 • Add a CSS file to the MyFirstApp project
    – Right Click Project  File  Import  General  File System
    – Browse to lab samples folder
        • styles.css
    – Import this file into the project


 • Open each of the 3 HTML files
    – Add a reference to the stylesheet at the start of the <HEAD> tag

<head>
   <link type="text/css" rel="stylesheet" href="styles.css"/>
   ...
</head>

16

Step 3: Add CSS - Preview

17

Step 4: Modify CSS


 • Lets add some missing pieces
 • Open styles.css
    – Add missing styles to the body definition:

    body { font-family: Helvetica, Arial;
           background-color: #92CD00;
           color: black; padding: 0.5em; }

    – Add missing styles to #pageTitle definition:
    #pageTitle { font-weight: bold;
                 font-size: 200%;
                 text-align: center;
                 vertical-align: middle;
                 background-color: #E5E4D7;
                 border-top: solid 2px #2C6700
                 border-bottom: solid 2px #2C6700}

18

Step 4: Modify CSS - Preview

19

Step 5: Add JavaScript


 • Add JavaScript files to the devConWidget project
    – Right Click Project  Import  General  File System
    – Browse to lab samples folder and import the following files:
        • json2.js
        • scripts.js
        • session_data.json

 • Open all three HTML files (index.html, feedback.html,
   selections.html) and add references to these two JavaScript files:
<head>
   <link src="style.css" type="text/css" rel="stylesheet"/>
   <script type="text/javascript" src="json2.js"></script>
   <script type="text/javascript" src="scripts.js"></script>
   ...
</head>

20

Step 5: Add JavaScript - Review

 • Open and review scripts.js file
 • JavaScript provides application functionality
    – shareWithFriend()
        • New Email screen opened in the Messages application
    – addMenus()
        • When Menu object is selected, a callback JavaScript function is invoked
    – showAbout()
        • Displays application details saved in config.xml
    – checkForUpdates()
        • Launches BlackBerry App World to a specified application page
    – addToCalendar()
        • Create a new pre-filled appointment the Calendar application

21

Step 5: Add JavaScript - Adding Features

 • What happens if you try to run the app now?
    – Error? This is expected at this point
    – Need to add the JavaScript APIs used to the whitelist.

22

Step 5: Add JavaScript - Adding Features

 • Open Configuration file (config.xml)
    – Any WebWorks JavaScript APIs used by application must be white listed
    – Add features in the Widget Permissions section of config.xml
    – Runtime errors may occur if features are not properly listed

23

Step 5: Add JavaScript - Preview

 • User can now click on interactive fields
    – User Icon = Share With a Friend
    – Envelope Icon = Feedback
    – Calendar Icon = Add session details to Calendar

24

Step 6: Modify JavaScript


 • Lets add some missing pieces
 • Open scripts.js
    – Complete the handleBackKey function (used on all screens):
    function handleBackKey() {
       if (confirm("Would you like to exit?")) {
          blackberry.app.exit();
       }
    }

    – Complete the displaySessionInfo function (used on index.html):
    function displaySessionInfo(id)
    {
       currentSession = new Object();
       currentSession.id = id;

        req = new XMLHttpRequest();
        req.onreadystatechange = handleDisplaySessionInfo;
        req.open('GET', "local:///session_data.json", true);
        req.send(null);
    }

25

Step 6: Modify JavaScript - Preview

26

Step 7: Enable Navigation Mode


• Open Configuration file (config.xml)
     – Enable “Use focus-based navigation …”
       checkbox


• Open all 3 HTML files
     – Add focusable property to each of the
       interactive <td> tags
<td id="shareIcon" x-blackberry-focusable="true" onclick="shareWithFriend()">
   <img src="img/user.png" class="imgIcon"/>
</td>

     – index.html: shareIcon, selectIcon,
       feedbackIcon, calendarIcon, messengerIcon
     – feedback.html: shareIcon, homeIcon
     – selections.html: shareIcon, homeIcon

27

Step 7: Enable Navigation Mode -
Preview

   BEFORE:                           AFTER:
   Default Navigation uses a         Focus Navigation is based on
   pointer to interact with screen   trackpad / trackball movement

28

Lab Complete

                        Congratulations!
 • You have created a fully working BlackBerry application:
    – Written entirely using Web technologies: HTML, CSS, JavaScript
    – Did not write a single line of Java code

29

Next Steps – Keep building


 • Explore other WebWorksAPI features
    – Revise and improve the source code created in this lab
    – http://www.blackberry.com/developers/docs/widgetapi


 • Suggestions:
    – Use System API to access system level functions and attributes
    – Proactively send updates to your users using Push API

30

Next Steps – Code Signing


 • Application must be signed before it can run on a live device
    – Signature keys are files used by the code signing tool
    – Signing process is integrated into the Development tools
    – Purchase keys for a one-time fee from BlackBerry DevZone
    – Testing on a Smartphone simulator does not require code singing


  http://na.blackberry.com/eng/developers/javaappdev/codekeys.jsp

31

Next Steps – App World Examples


• Submit your WebWorks applications to App World

   http://appworld.blackberry.com/webstore/search/webworks


   All Guitar Chords      Chatmosphere IRC           Hollywood Bowl

32

Sneak Peek – PlayBook WebWorks

• Re-Build your existing WebWorks applications for PlayBook
   – SDK produces a *.bar application file instead of *.cod
   – Support both BlackBerry platforms with the same source code
   – Attend HOL6 (Tim Neil, Prosanta Bhattacherjee) for more info

33

Summary

1. BlackBerry Web Plug-in for Eclipse (or Visual Studio 2008)
2. Configuration document is the backbone of a WebWorks app
3. Use JavaScript APIs to access BlackBerry features
4. Distribute your application through App World

34

For More Information

• BlackBerry Developer Zone:
   – Download BlackBerry development tools & simulators
   – Developer Resource Center
   – Web Community Forum
   – Developers Blog: http://devblog.blackberry.com
   – Twitter: http://twitter.com/BlackBerryDev
   – App World: http://www.blackberry.com/developers/appworld


   http://www.blackberry.com/developers/widget

35

Thank You
    Alan Wong
alawong@rim.com
February 26, 2011

More Related Content

Web works hol

  • 1. Hands On Lab: BlackBerry WebWorks Bootcamp Alan Wong [email protected] February 26, 2011
  • 2. TODAY’S GOAL Building an application using the BlackBerry WebWorks App Platform
  • 3. Setup • This lab will use the following developer tools: – Oracle Java Development Kit (JDK) version 1.6 – BlackBerry WebWorks Packager version 1.5 – BlackBerry WebWorks Plug-in for Eclipse version 2.5 • Lab Sample Code – Starter and Solution Files Source Code • Images, HTML + CSS + JavaScript – Available on site
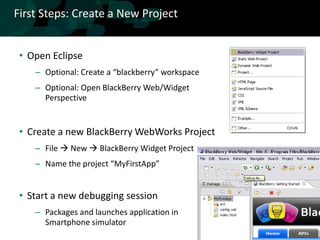
  • 4. First Steps: Create a New Project • Open Eclipse – Optional: Create a “blackberry” workspace – Optional: Open BlackBerry Web/Widget Perspective • Create a new BlackBerry WebWorks Project – File  New  BlackBerry Widget Project – Name the project “MyFirstApp” • Start a new debugging session – Packages and launches application in Smartphone simulator
  • 5. Your First WebWorks Application
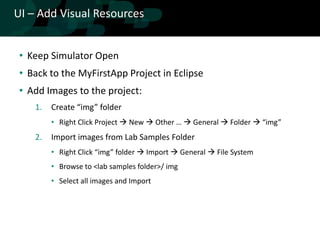
  • 6. UI – Add Visual Resources • Keep Simulator Open • Back to the MyFirstApp Project in Eclipse • Add Images to the project: 1. Create “img” folder • Right Click Project  New  Other …  General  Folder  “img” 2. Import images from Lab Samples Folder • Right Click “img” folder  Import  General  File System • Browse to <lab samples folder>/ img • Select all images and Import
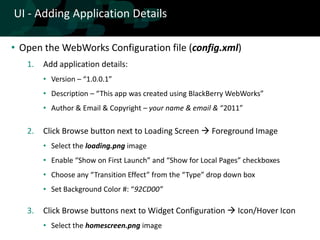
  • 7. UI - Adding Application Details • Open the WebWorks Configuration file (config.xml) 1. Add application details: • Version – “1.0.0.1” • Description – “This app was created using BlackBerry WebWorks” • Author & Email & Copyright – your name & email & “2011” 2. Click Browse button next to Loading Screen  Foreground Image • Select the loading.png image • Enable “Show on First Launch” and “Show for Local Pages” checkboxes • Choose any “Transition Effect” from the “Type” drop down box • Set Background Color #: “92CD00” 3. Click Browse buttons next to Widget Configuration  Icon/Hover Icon • Select the homescreen.png image
  • 8. UI - Adding Application Details
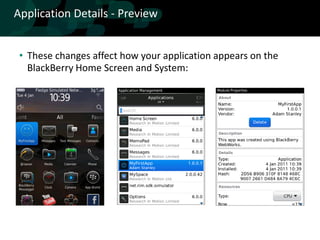
  • 9. Application Details - Preview • These changes affect how your application appears on the BlackBerry Home Screen and System:
  • 10. Building Blocks of a WebWorks Application • HTML – Use HTML to create the structure of a screen • CSS – Use CSS to apply a theme / style to your application • JavaScript – Use JavaScript to add functionality in your application • Index.html – By default a WebWorks application loads this page as its starting point – Initial launch page can be overridden in config.xml
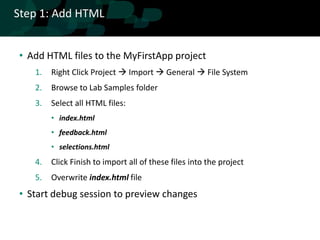
  • 11. Step 1: Add HTML • Add HTML files to the MyFirstApp project 1. Right Click Project  Import  General  File System 2. Browse to Lab Samples folder 3. Select all HTML files: • index.html • feedback.html • selections.html 4. Click Finish to import all of these files into the project 5. Overwrite index.html file • Start debug session to preview changes
  • 12. Step 1: Add HTML - Preview
  • 13. Step 2: Modify HTML • Lets add some missing pieces • Open index.html and feedback.html and selections.html – Remove borders from all tables <table style="width:100%;" cellspacing="0" cellpadding="0" border="0"> – Replace five image placeholders with corresponding <IMG> tags • Top: Left = User.png; Right = Selections.png • Bottom: Left = Feedback.png; Middle = Calendar.png; Right = Messenger.png <td id="shareIcon"> <!-- Add image here: img/user.png --> <img src="img/user.png" class="imgIcon"/> </td>
  • 14. Step 2: Modify HTML - Preview
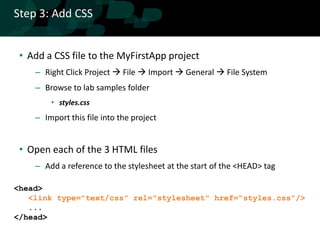
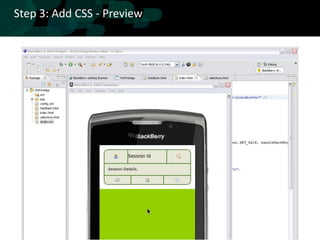
  • 15. Step 3: Add CSS • Add a CSS file to the MyFirstApp project – Right Click Project  File  Import  General  File System – Browse to lab samples folder • styles.css – Import this file into the project • Open each of the 3 HTML files – Add a reference to the stylesheet at the start of the <HEAD> tag <head> <link type="text/css" rel="stylesheet" href="styles.css"/> ... </head>
  • 16. Step 3: Add CSS - Preview
  • 17. Step 4: Modify CSS • Lets add some missing pieces • Open styles.css – Add missing styles to the body definition: body { font-family: Helvetica, Arial; background-color: #92CD00; color: black; padding: 0.5em; } – Add missing styles to #pageTitle definition: #pageTitle { font-weight: bold; font-size: 200%; text-align: center; vertical-align: middle; background-color: #E5E4D7; border-top: solid 2px #2C6700 border-bottom: solid 2px #2C6700}
  • 18. Step 4: Modify CSS - Preview
  • 19. Step 5: Add JavaScript • Add JavaScript files to the devConWidget project – Right Click Project  Import  General  File System – Browse to lab samples folder and import the following files: • json2.js • scripts.js • session_data.json • Open all three HTML files (index.html, feedback.html, selections.html) and add references to these two JavaScript files: <head> <link src="style.css" type="text/css" rel="stylesheet"/> <script type="text/javascript" src="json2.js"></script> <script type="text/javascript" src="scripts.js"></script> ... </head>
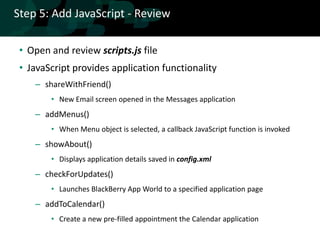
  • 20. Step 5: Add JavaScript - Review • Open and review scripts.js file • JavaScript provides application functionality – shareWithFriend() • New Email screen opened in the Messages application – addMenus() • When Menu object is selected, a callback JavaScript function is invoked – showAbout() • Displays application details saved in config.xml – checkForUpdates() • Launches BlackBerry App World to a specified application page – addToCalendar() • Create a new pre-filled appointment the Calendar application
  • 21. Step 5: Add JavaScript - Adding Features • What happens if you try to run the app now? – Error? This is expected at this point – Need to add the JavaScript APIs used to the whitelist.
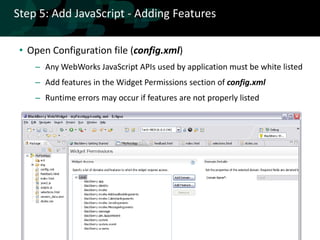
  • 22. Step 5: Add JavaScript - Adding Features • Open Configuration file (config.xml) – Any WebWorks JavaScript APIs used by application must be white listed – Add features in the Widget Permissions section of config.xml – Runtime errors may occur if features are not properly listed
  • 23. Step 5: Add JavaScript - Preview • User can now click on interactive fields – User Icon = Share With a Friend – Envelope Icon = Feedback – Calendar Icon = Add session details to Calendar
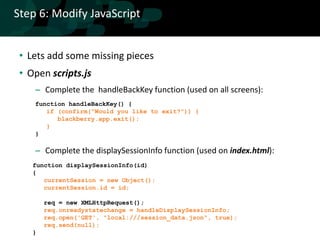
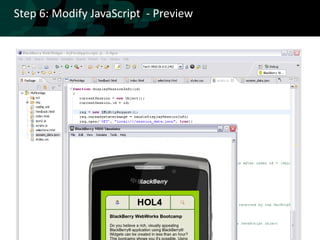
  • 24. Step 6: Modify JavaScript • Lets add some missing pieces • Open scripts.js – Complete the handleBackKey function (used on all screens): function handleBackKey() { if (confirm("Would you like to exit?")) { blackberry.app.exit(); } } – Complete the displaySessionInfo function (used on index.html): function displaySessionInfo(id) { currentSession = new Object(); currentSession.id = id; req = new XMLHttpRequest(); req.onreadystatechange = handleDisplaySessionInfo; req.open('GET', "local:///session_data.json", true); req.send(null); }
  • 25. Step 6: Modify JavaScript - Preview
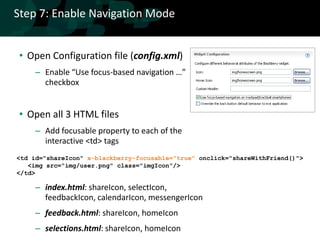
  • 26. Step 7: Enable Navigation Mode • Open Configuration file (config.xml) – Enable “Use focus-based navigation …” checkbox • Open all 3 HTML files – Add focusable property to each of the interactive <td> tags <td id="shareIcon" x-blackberry-focusable="true" onclick="shareWithFriend()"> <img src="img/user.png" class="imgIcon"/> </td> – index.html: shareIcon, selectIcon, feedbackIcon, calendarIcon, messengerIcon – feedback.html: shareIcon, homeIcon – selections.html: shareIcon, homeIcon
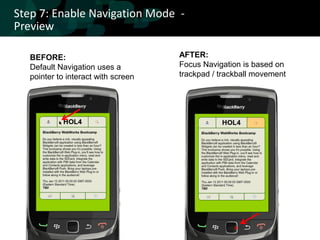
  • 27. Step 7: Enable Navigation Mode - Preview BEFORE: AFTER: Default Navigation uses a Focus Navigation is based on pointer to interact with screen trackpad / trackball movement
  • 28. Lab Complete Congratulations! • You have created a fully working BlackBerry application: – Written entirely using Web technologies: HTML, CSS, JavaScript – Did not write a single line of Java code
  • 29. Next Steps – Keep building • Explore other WebWorksAPI features – Revise and improve the source code created in this lab – http://www.blackberry.com/developers/docs/widgetapi • Suggestions: – Use System API to access system level functions and attributes – Proactively send updates to your users using Push API
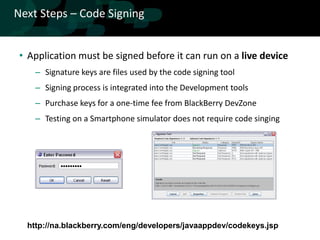
  • 30. Next Steps – Code Signing • Application must be signed before it can run on a live device – Signature keys are files used by the code signing tool – Signing process is integrated into the Development tools – Purchase keys for a one-time fee from BlackBerry DevZone – Testing on a Smartphone simulator does not require code singing http://na.blackberry.com/eng/developers/javaappdev/codekeys.jsp
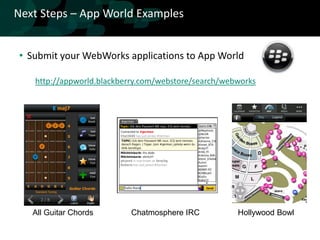
  • 31. Next Steps – App World Examples • Submit your WebWorks applications to App World http://appworld.blackberry.com/webstore/search/webworks All Guitar Chords Chatmosphere IRC Hollywood Bowl
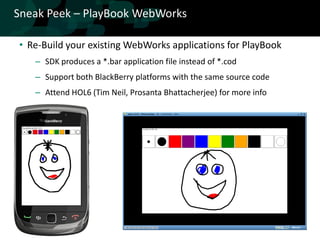
  • 32. Sneak Peek – PlayBook WebWorks • Re-Build your existing WebWorks applications for PlayBook – SDK produces a *.bar application file instead of *.cod – Support both BlackBerry platforms with the same source code – Attend HOL6 (Tim Neil, Prosanta Bhattacherjee) for more info
  • 33. Summary 1. BlackBerry Web Plug-in for Eclipse (or Visual Studio 2008) 2. Configuration document is the backbone of a WebWorks app 3. Use JavaScript APIs to access BlackBerry features 4. Distribute your application through App World
  • 34. For More Information • BlackBerry Developer Zone: – Download BlackBerry development tools & simulators – Developer Resource Center – Web Community Forum – Developers Blog: http://devblog.blackberry.com – Twitter: http://twitter.com/BlackBerryDev – App World: http://www.blackberry.com/developers/appworld http://www.blackberry.com/developers/widget
  • 35. Thank You Alan Wong [email protected] February 26, 2011