Site Performance: Caching Pages to Optimize Loading Speed
4 min read
Cache your site pages to speed up their loading time. When a page is cached, its content and elements aren't rendered from scratch for each visitor. Instead, most visitors see a saved (cached) version of the page that loads much faster.
Caching is automatically enabled for most of your pages, but you may need to manually enable it in some cases (e.g. pages that contain Velo code).
In this article, learn more about:
How caching works
A cache is a temporary storage area, where versions of your pages are saved so they take less time to load. Wix uses SSR (server-side rendering) to cache or "save" pages to a content delivery network (CDN).
Most site pages are cached automatically after receiving their first visitor. The next time a visitor requests the page, the saved version is displayed. This prevents all of the page's elements and assets from having to load from scratch.
The cached version is usually stored for up to a week on our servers. When this duration elapses, the page is cleared and removed from the CDN. However, the page will be cached again after the next visitor loads it.
Multiple cached versions for different visitors
Distinct cached copies of the same page may be created according to your visitors' geographic locations, device types, and other parameters.
When a page is cached, it loads quicker for future visitors who share the same parameters as the first visitor. If the next visitor doesn't share these parameters, they see the regular version of the page so it doesn't load as quickly.
However, their visit creates another cached version based on their specific parameters. Any subsequent visitors with the same parameters see the additional cached version that was created.
Caching and site performance metrics
Cached pages may help to improve your overall site performance, including metrics like LCP (largest contentful paint), and FCP (first contentful paint). This can improve your site's core web vitals score and overall search results ranking.
As most of the site is already loaded on the Wix servers, your visitors' devices don't need to do as much processing. The site is also rendered from the nearest geographical CDN to the device, which can encourage faster loading.
Enabling and disabling caching on site pages
For most pages, caching is enabled automatically. However, if you have custom code on a page that doesn't have any issues with page caching (e.g. it doesn’t access external data sources), you can manage it manually.
Alternatively, if the page contains custom code and information that needs to be externally retrieved each time a visitor loads the page, you can also prevent the page from being cached completely.
To enable or disable caching:
- Go to the relevant page in your Editor:
- Wix Editor: Click Pages & Menu
on the left side of the Editor.
- Editor X: Click Pages
 at the top of Editor X.
- Wix Editor: Click Pages & Menu
- Hover over the page and click the More Actions icon
.
- Click Settings.
- Click Advanced Settings.
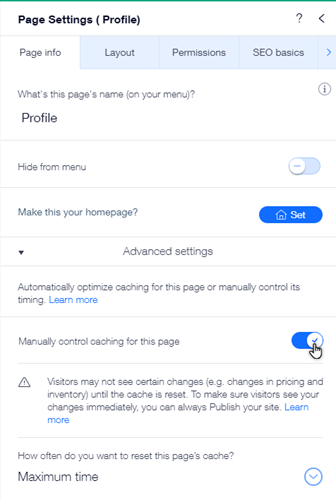
- Click the Manually control caching for this page toggle and choose what you want to do:
- Enabled: You can manually control the caching for this page.
- How often do you want to reset this page's cache?: Choose how frequently your page cache resets from the dropdown menu, or select Never (disable caching) to prevent the page from being cached altogether.
- Disabled: The page will be cached automatically.
- Enabled: You can manually control the caching for this page.

FAQs
Click below to read answers to our most frequently asked questions on page caching.
Are there any pages that cannot be cached?
How does caching affect Velo?
When is cache cleared?
Did this help?
|