![]()
Note: Special thanks is due to Scott Eichengrun for this article, specifically showing me how to get the two phone rig going.
This article is a tutorial on how to configure Charles Proxy to inspect traffic over cellular networks, and while it’s designed with ad operations use cases in mind, it’s applicable to any front end web developer with similar needs.
There are many articles out there on how to use Charles Proxy through your phone – I’ve written two myself, in fact. All those articles assume you’re leveraging a Wifi network when connecting to the internet, however and while that’s fine for basic testing on mobile web and mobile apps, there are often reasons why you want to inspect traffic over a true cellular network instead.
Perhaps you need to debug an ad that relies on carrier targeting, or you want to measure data usage or network latency through a true cellular connection. These are more advanced use cases to be sure, but when you can’t get by with using your phone with Charles over Wifi, or a mobile emulator in Developer Tools. Plus, Charles Proxy offers a host of powerful features like breakpoints, which you can use to test an experience in stages, or rewrite rules to reference a local file before you update your server, or blacklisting, which can be helpful to isolate the root of various technical problems.
The Hardware Setup
Before you start, you’ll need:
- A laptop running Charles Proxy. I’m using a Mac in this case, but you could do this with a PC as well.
- Two phones, at least one which can be enabled as a mobile hotspot. I’m using two iPhone 7 in this case, but you could do this with Android devices as well.
Yes, unfortunately you’ll need two phones to setup this rig – the first is used as a mobile hotspot, the second to actually browse the web / app you need to test. The reason you can’t simply run the connection over a single phone is because you have to manually set the IP address and port of your network connection for Charles to inspect your traffic, and you can’t do that on your phone’s cellular connection. Creating a mobile hotspot however gives you the ability the adjust those settings on the device connecting through it. So you’re using one phone for its mobile network and the other phone as the client that proxies requests through Charles.
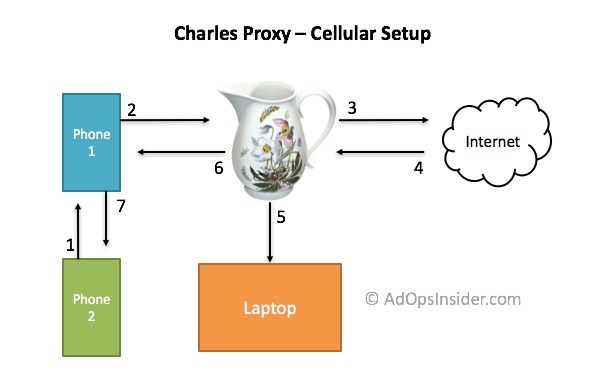
In this configuration, Phone 2 (the client) is what you would browse your website / app on. Phone 2 makes requests (1) to Phone 1’s hotspot network, which would normally connect directly to the internet, but in this case has its requests (2) intercepted by Charles (the proxy), which records (5) and then forwards the requests to the end server on the internet (3). When the server responds (4), the whole process happens in reverse. Charles intercepts the response, records it (5), sends it on to phone 1 (6), which then sends the final response to phone 2 (7). In this case, the laptop is essentially acting as a host for Charles and Phone 1 is acting as a router.
If that all makes sense, you’re ready to start on the actual configuration. I struggled a bit setting this up myself for the first time, so I’ve tried to document it in detail.
Add the Charles Proxy Root Certificates To Your Laptop
If this is your first time using Charles, you first need to download the Charles SSL certificate on both phones as well as your laptop. While I won’t go into how SSL communication works here, Charles needs this certificate so it can handle secure requests between your browser and web servers and decrypt the content.
If you don’t complete this step, you’ll see security warnings from your browser any time you go to a secure webpage, not to mention all the content you see in Charles will be encrypted and unreadable. You’d be surprised how much of ad tech runs on secure protocol, so I’d highly recommended you complete this step. To read more about what the Charles root certificate does, see the documentation here. These steps are for Mac; you’ll follow a different process for PC which are described on the Charles website.
Step 1: Open Charles and navigate to Help > SSL Proxying > Save Charles Root Certificate. This will add the necessary certificate to your computer, but won’t enable it just yet.

Step 2: From here, you may have to unlock your System Keychain so you can add the Charles Certificate and Modify its trust settings so your computer will allow the certificate to be used. You’ll likely get an error that prompts you to do this automatically.
Step 3: Click the ‘System’ folder, and then click the lock icon above. You’ll have to enter your laptop password as a security precaution.

Step 4: Now, you should see the Charles root certificate listed. Right-click on it, and navigate to ‘Get Info’.
Step 5: Now, under ‘Trust Settings’, change the setting for ‘When Using this certificate’ to ‘Always Trust’.

Step 6: Now, you should be able to navigate to any webpage on your browser, and see that SSL connections go through and are decrypted in the Charles application.
Add the Charles Proxy Root Certificates To Your Phones
Just like we had to give Charles permission to sign SSL certificates on behalf of our browser on our laptop, we need to add them to our respective phones as well. In this case, I suggest you de-activate the Certificates on each phone after you are done using Charles if you are using your real phone and not a dedicated test device. See the very last step on this article to see how to do that.
Step 1: Connect phone 1 to your laptop via USB cable.
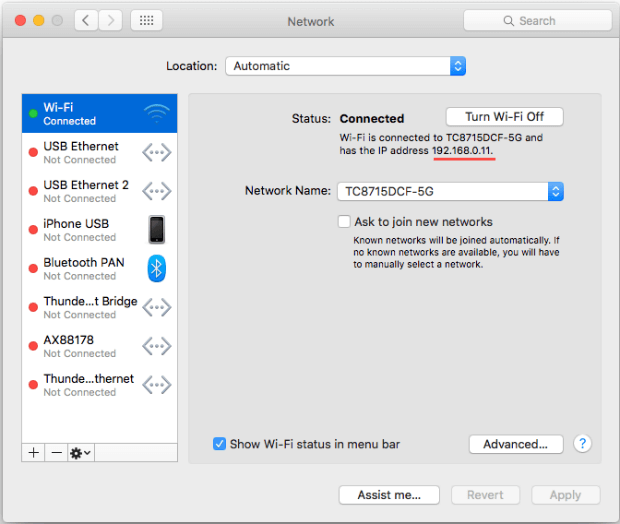
Step 2: Make sure your laptop is connected to your home Wifi network, or at least not a hotspot via phone 1. Then, in System Preferences > Network, look up your computer’s IP address. You need this to configure manual proxy settings on your phone in the next step. Word to the wise, don’t just search Google for ‘what’s my IP?’ and use that information, as it might be your router’s IP address instead of your computer’s address. Your computer’s Network settings will tell you the correct information.
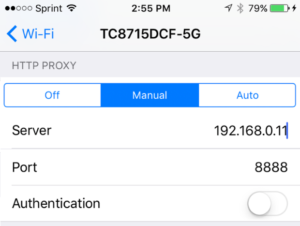
Step 3: Now on phone 1, navigate to Settings > Wifi > Wifi settings (‘i’ icon) and at the bottom, set manual proxy settings. Change the IP address your computer’s IP, and set the port to 8888.
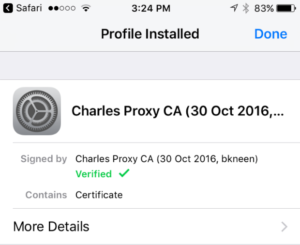
Step 4: Now navigate to http://www.charlesproxy.com/getssl on your phone, which will ask for permission to install the root certificate. Follow all the approval steps until the certificate is successfully added to your phone.
Step 5: Disconnect phone 1, and repeat this process with phone 2.
Using Charles Proxy Over Cellular Networks
With the SSL certificates installed, you can now put the whole rig together and start debugging network requests. And good news! Next time you won’t have to do any of the SSL installation work, but can just go right to step 1 below.
Step 1: Open Charles Proxy on your laptop.
Step 2: Hardwire phone 1 to your laptop.
Step 3: In Settings, turn ‘Personal Hotspot’ to On.
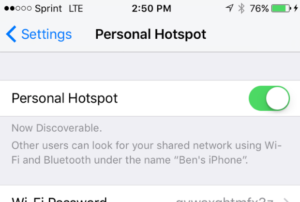
Step 4: In System Preferences > Network, change the Laptop’s connection to the Phone’s USB connection, and turn off your Wifi antenna as illustrated in Step 5. This will force your laptop to use the cellular hotspot to connect to the internet instead of it’s Wifi antenna.
Step 5: In System preferences > Network, connect laptop to a cellular network via hotspot. Not that you need to ensure the ‘Disable unless needed’ box is unchecked, otherwise your computer won’t join the hotspot network. Important note that because you are now on your phone’s hotspot and not your Wi-Fi network, your IP address has changed since you installed your SSL certificates – don’t reuse the IP address from the prior setup steps.

Step 6: Connect phone 2 to phone 1’s hotspot, the same connection your laptop is using.
Step 7: Allow phone 2 to connect through Charles when prompted.

Step 8: Now you can use phone 2 to test whatever you like and record its network activity with Charles Proxy, including mobile apps. Best of all, unlike a mobile emulator, native features to the phone like the gyroscope, accelerometer, GPS antenna, and more all still work.
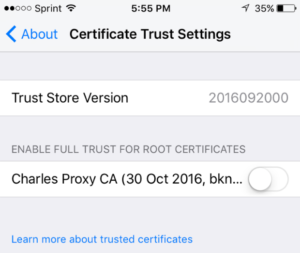
Step 9 (optional): Once you’re finished with your debugging work, you can disconnect phone 1 and turn your Wifi antenna back on. You’ll also want to close, or at least disable Charles Proxy from recording all HTTP activity. You’ll also want to switch the manual proxy settings on each phone off, otherwise the phone won’t be able to connect to the internet. Finally, while not testing it’s probably a good idea to disable the Charles Root Certificates on each phone by going to Settings > About > Certificate Trust Settings and toggling the Charles Proxy CA to ‘off’.
Hello and thank you so much for posting this, it will be a huge help once I get it working. Right now I’m having an issue where I’ve got the SSL certificates and everything set up, and connected to the hotspot through USB for my laptop and wifi through Phone 2. I set the Proxy settings on Phone 2 to the new IP from the hotspot, but it’s never hitting the charles log.
Internet connections fail when they attempt to go anywhere, but charles isn’t getting hit. Is there something I’m missing after connecting Phone 2 to Phone 1’s Hot spot?
I would debug this step by step:
1. Forget about the cellular network for a second, let’s just make sure the proxy settings work. Connect phone 1 to your laptop’s wifi connection through manual proxy settings (like I show in the root certificate section, step 3) using your laptop’s IP address. Now try to access the internet through phone 1 – does it work? If not, check the network IP settings again, and check the manual proxy settings on the phone again. I found that a few times the manual proxy settings didn’t save for some reason. Charles should prompt you (step 7) when you try to use the internet on phone 1 as well, and add it’s IP to the Access Control Settings under the Proxy menu in Charles, essentially authorizing that IP. Check to see if that’s happening.
2. If that works now let’s test your hotspot connection; wire your phone to your laptop, turn off your Wifi, and see if your laptop can still access the internet. If so, turn Charles on and see if Charles will capture the laptop’s activity over hotspot.
3. If that works, now let’s try connecting phone 2 again through proxy settings. Remember, you need to check the Network’s IP address (what I show in the root certificate section, step 2) because it’ll have changed from the wifi network. It’s not the cell network’s IP, not the Wifi’s IP. When you connect your phone through the manual proxy, Charles should prompt you for authorization if you haven’t done so already.
4. If you do all that and it’s still not working and you’re on a Mac, is MacOS proxy enabled under the Proxy menu in Charles? Under SSL Proxy Settings under the Proxy menu in Charles, did you add a wildcard to allow requests for all URLs?
5. If all that STILL doesn’t work, I’d try a restart on all devices and try again.
Hope that solves it!
Ben
I’m having the same issue as you, Kevin. Were you able to get this working?
@Kevin and Joel:
I was having the same issue, but I was able to make it work by:
1. Instead of connecting the Mac via USB to the phone, I connected it via wifi to the Mobile Hotspot
2. On Phone 2, set the proxy with the IP address of the Mac (which will be different than Phone 1 ip address)
Or now in 2018 … just install the native iOS Charles app and turn it on 🙂