Rows and Columns in Microsoft ExcelWhat is meant by the term Row in Microsoft Excel?We all know that in the Microsoft Excel, each Row is basically denoted as well as identified by the unique numeric value which we can be easily seen on the left-hand side of the selected sheet as well. And the row numbers are arranged vertically on the given worksheet which is ranging from 1 to 1,048,576 it means that we have 1,048,576 rows in Microsoft Excel. And the rows in the Excel sheet themselves run horizontally on a worksheet effectively. The data is usually placed horizontally in the given table and will move across from left to right direction. Besides all this, in the Microsoft Excel Row named as "1" is considered to be the first row in the sheet, as we can see in the example below, we can easily select the whole Row with the row number 3 by just clicking on the particular number.  Moreover, to navigate through the numbers as well as reach out to the last Row, we can use the below-mentioned one as well:
What do we mean by the term Columns in Microsoft Excel?The columns in the Microsoft Excel is primarily denoted as well as identified by a unique alphabetical header letter, and the column is located just at the top of the selected worksheet. And the column headers, that are ranging out from A to XFD, the Excel spreadsheets, can have 16,384 columns. And the columns in the Microsoft Excel will run vertically in the selected worksheet, as well as the data goes from up to down direction respectively. And in Microsoft Excel, the Column named 'A' is considered the first Column; from the example mentioned below, we can easily see that the whole Column with header B is selected by just clicking on the letter which are present at the top of the sheet.  And if in case we need to move to the last Column:
What is cell in Microsoft Excel?It was well known that a cell is usually an intersection of rows and a column. A row, as well as a column adjoined, makes up a cell. A cell can be defined as the combination of the row number as well as a column header all together. Besides all this, we can also select an entire row or Column from a given cell.
What are the key differences between Excel Row and Excel Column?The significant difference associated with the Row and columns in Microsoft Excel is as follows:
Comparison Table for Row and Columns in Microsoft ExcelWe will be having a quick look at the top 5 Comparison that exist between row and column.
How one easily Select Rows as well as Columns in Microsoft Excel?In this we will be learning out how one can select the rows and columns in Microsoft Excel. #Example 1: Rows and columns in Microsoft Excel It is well known that when we normally open a workbook, then, we can see that the particular sheet usually contains the tabular rows as well as the columns where each Row is specified by its row number as well as the Column and specified by their column header respectively. Let us now consider the below example, which contains some of the data in an Excel sheet. And here, we will be seeing how we can easily select the rows as well as the columns in Microsoft Excel:  As in the above screenshot, we can see that the respective names and the age column have their header names, which are stored in A and B, and each Row has its row number as well. And In the Excel sheet, each time we select a row or a column, the "Name Box" will primarily display the specific row number and the column name, shown below the screenshot, respectively.  Moreover, in this example, we will be selecting out the Names as well as the Age, and then we will be seeing how rows and the column head selection are displayed on the selected sheet as well. Step 1: First, see how the rows and cell Names are as 'John.' And once we are done with selecting the cell name, John, then after we will get the row number as well as the column name labeled as A2 in the name box, which means that we have selected column A and the second Row as A2, as depicted below screenshot with the yellow highlighted cell as "Johan."  Step 3: In this step we will be selecting out the cell 23, which will be depicting out the selected cell as B2.  Step 4: We will be selecting out all the names as well as the columns in order to show that we have 4 rows and 2 columns:  In this way, we can quickly identify the row number and the column name by selecting each cell in Microsoft Excel. #Example2: Changing Row and Column Size In this example, we will see how we can easily change the Row as well as the column size. It was well known that the Microsoft Excel row, as well as the column width size, can be easily modified by making use of the format option in the HOME menu, which is shown below. By just making use of the respective format menu, we can easily change the Row as well as the column width where we have the list option:
Now we will consider the below example to change the Row as well as the column width, and for this we are required to follow the below-mentioned steps very carefully.  Step 1: We are required to select the second Row. 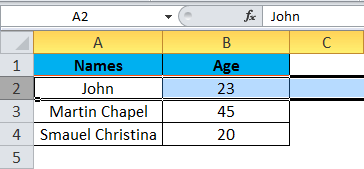 Step 2: Now, after that, we are required to go to the "Format menu" and we will be clicking on ROW HEIGHT respectively:  Step 3: Once we have selected the ROW HEIGHT, we will be getting the dialog box below to change the Row's height as well.  Step 4: We will be then increasing the row height to 25 so that the selected row height will increase.  We can see that the row height has increased as compared to the previous one; alternatively, we can change the row height by using the mouse.  Step 5: After that, we will be going to the second option, that are present in the format list known as "AUTOFIT ROW HEIGHT," that will automatically reset the Row to its original height. Step 6: We will again selecting the same Row and will go to the Format menu. Step 7: After that, we will select the "AutoFit Row Height" respectively.  And once we click on the "AutoFit Row Height" option, the row height will reset to the original position.  Adjusting Column WidthIn this, we can adjust the column width similarly by just using the format option. Step 1: First of all, we are required to click on the cell B cell respectively:  Step 2: In this step, we will be moving to the Format menu, and then will click on column width.  And once we click on the Column width, we will get out the below dialog box to increase the column width.  Step 3: We will be increasing the column width by 15 to increase the column width.   As in the above screenshot, we can easily see that the column width has been increased; alternatively, we can also adjust the column width by just making use of the mouse where if we have just place the mouse cursor, and we will be getting the + plus mark sign near to the Column. Step 4: At last we will be clicking on the next option, "AutoFit Column width." So that the selected Column will be get reset to its original size. What are the basic things need to be remembered by an individual while working with the Row and columns in Microsoft Excel?The basic things that need to be remembered by an individual while working with the Row as well as the columns in Microsoft Excel are as follows:
Next TopicHow to format Excel Sheet |


We provides tutorials and interview questions of all technology like java tutorial, android, java frameworks
G-13, 2nd Floor, Sec-3, Noida, UP, 201301, India


