Performing routine dryer maintenance is useful for making your dryer run more efficiently and extending the lifespan of your appliance. Plus, regularly showing your dryer some TLC prevents not-so-ideal incidents such as house fires (a clogged vent can pose a fire hazard).
Cleaning your dryer is a very doable DIY homeowner task, and you likely already have most (if not all) of the necessary supplies right in your home.
Turn Off Your Dryer
The prep work for cleaning your dryer is simple: Turn off the dryer! If you have an electric dryer, you’ll unplug the cord, while a gas dryer also requires you to shut off the gas supply.
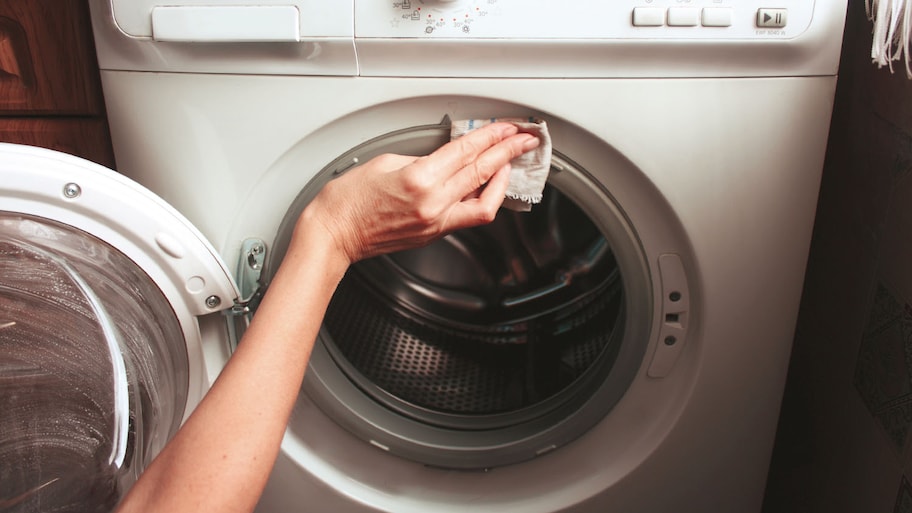
Clean the Exterior
Photo: Tenenbaum / Adobe Stock
After you’ve turned off the power, it’s time to clean. Get started by cleaning the exterior part of the dryer. You can simply apply soapy water with a (lint-free) cloth, or use an all-purpose cleaning solution.
Take Out the Vent Clamp
A vent clamp is what keeps the dryer vent secured around the dryer. You’ll want to remove this before cleaning your dryer. Pull out the dryer so you can access the vent duct, which looks like a silver coil, and is located on the back of the dryer.
To unscrew and remove the vent clamp, you can use a screwdriver, or, with some clamps, you can simply squeeze it.
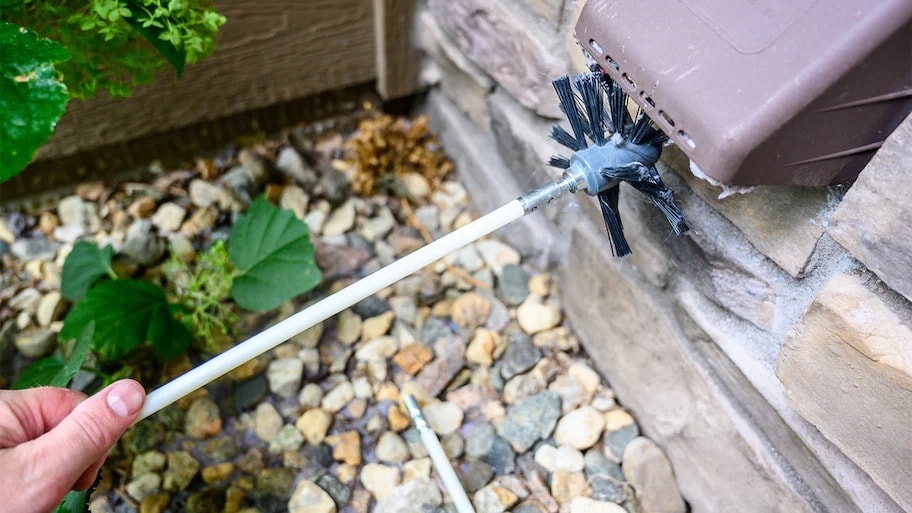
Clean the Dryer Vent
When cleaning your dryer, it's important not to forget about cleaning the dryer vent.This step is crucial for maintaining both the efficiency of your dryer and the safety of your home. Begin by disconnecting the power source and moving the dryer away from the wall. Locate the vent opening, at the back of the machine, and detach the vent hose. You can use either a vent brush or a vacuum with an attachment to remove any lint or debris that has accumulated in both the hose and vent opening.
Next, head outside and locate your dryer’s exterior vent. Carefully remove its cover and clear out any debris that may have built up over time. Cleaning your dryer vent will ensure unobstructed airflow, reducing potential fire hazards and extending your appliance's lifespan.
However, if you find this task challenging, or encounter any difficulties along the way, it's always wise to seek the help of a professional dryer technician. Though the cost to clean a dryer vent averages around $150, this guarantees a safe and effective vent cleaning process.
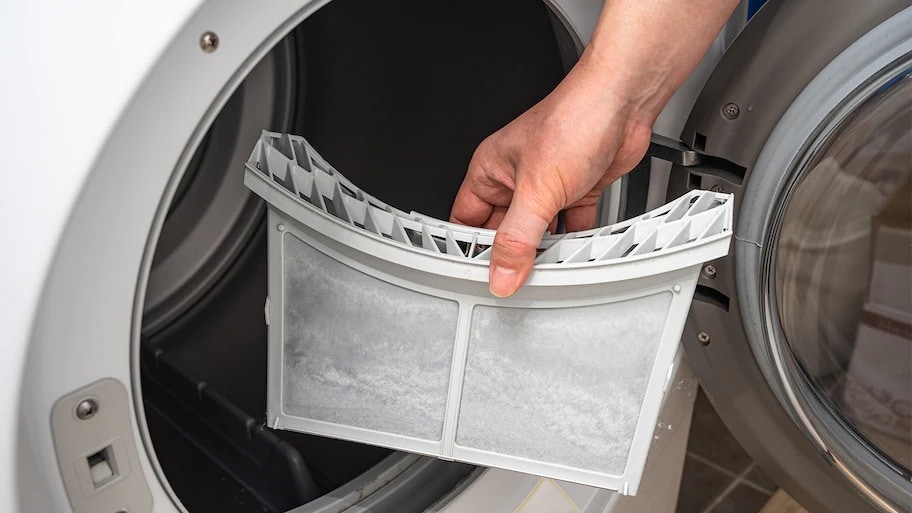
Clean the Lint Trap
Photo: JYPIX / Adobe Stock
Your lint trap prevents debris and other unwanted particles from getting into the dryer. In doing so, an accumulation of lint and debris can build up and cause fire hazards. This is why it’s important to include cleaning the lint trap in your dryer cleaning routine. "The lint trap is the only piece of the dryer that needs to be cleaned after each use,” said Asya Biddle, Angi Expert Review Board member and manager of The Dustbusters, a family-owned and operated janitorial company in Williamsport, PA. “Not only does it help with the efficiency of drying, but it also prevents the buildup of flammable material." Using your lint brush, scoop and remove as much lint as possible from the trap. To be extra vigilant, use a vacuum with an attachment to remove any and all lint.
Clean the Dryer Drum
Photo: Lost_in_the_Midwest / Adobe Stock
The dryer drum (where you put your wet laundry) is the largest dryer component, and hair, pet fur, and threads can become stuck inside it. "By cleaning the dryer drum, you’re removing any object or substance that may come in contact with your wet clothing and cause damage, including gum, pens, or food debris," Biddle said.
Look inside the drum and remove anything stuck inside. If you can’t do this by hand, you can try using a spatula or credit card to scrape them out. Use your vacuum to get any hard-to-reach spots.
Next, scrub any messes clean in the dryer drum. If there are any sticky spots or stains, use olive oil to scrape them off. Once you’ve removed all of the sticky spots and various messes, use soapy water to wipe the entire drum clean.
Run a Dryer Cycle
Once you have cleaned all the parts of your dryer, it's important to complete the cleaning process by running an empty cycle. This step is crucial to get rid of any traces of dust, lint, or cleaning agents that might still be lingering inside the machine.
First make sure that the lint filter is clean and properly in place because a clogged filter can affect how well the cycle works. When you're ready, choose a heat "Air Fluff" cycle to avoid any damage and ensure a safe and smooth operation. Allow the cycle to run for 10-15 minutes so that the dryer can blow out any remaining debris.
You can also take this opportunity to wipe down the inside of the drum with a cloth and remove any residue. Running a dryer cycle not only guarantees that your dryer is clean and ready for regular use, but also improves air circulation and enhances drying efficiency in future loads.
DIY vs. Hiring a Pro to Clean Your Dryer
If you want to cut costs, cleaning your dryer DIY-style is a great way to do it. Sometimes, though, you may need extensive cleaning or inspection. A house cleaner costs on average around $200 per visit, but can vary depending on the number of rooms you need cleaned. Keep in mind that they wouldn’t just clean your dryer, but can also help you clean your washing machine and organize and clean your laundry room.
Absolutely! Cleaning the interior of your dryer is crucial to maintain its efficiency and safety. As time goes by, lint, debris, and residues from dryer sheets tend to build up inside the drum, on the lint trap, and around the heating elements. Regular cleaning of the inside of the dryer prevents these particles from blocking the system, ensuring smooth airflow, and reducing the risk of fire hazards.
The frequency of cleaning your dryer depends on how often you use it. For regular households, it is recommended to clean the lint trap after each load of laundry. Additionally, thorough cleaning of the dryer—lint trap, drum, and exterior—should be done every few months. It's important to pay attention to the vent system as well. Ideally, it should be cleaned at least once a year, or six months if your dryer takes care of huge loads often, or more frequently if you notice reduced drying efficiency.
If you're dealing with an odor in your dryer that transfers onto your clothes and linens, here's what you can do: start by cleaning the lint trap and drum with warm soapy water. Then wipe down the interior using a mixture of equal parts water and white vinegar to eliminate any lingering odors.
To get rid of odors you can try this method: take a cloth soaked in vinegar and put it inside the dryer. Run the dryer on a heat setting for 15 minutes. Afterward, make sure to dry the drum by running it with some towels. This technique helps eliminate any smells and leaves your dryer smelling nice and fresh.
If the odors remain, you may need to sanitize your dryer or call in a professional house cleaner to handle the job.
Kimberly is a seasoned writer, blending the worlds of personal finance and home improvement to help you transform your living space while keeping your budget in check. Discover her insights on achieving financial wellness and creating a beautiful home in publications like MSN.
Kimberly is a seasoned writer, blending the worlds of personal finance and home improvement to help you transform your living space while keeping your budget in check. Discover her insights on achieving financial wellness and creating a beautiful home in publications like MSN.