


Securing a Website with SSL
SSL/TLS certificates enable visitors to connect to your site with HTTPS, a secure protocol for exchanging information on the Internet. SSL certificates add a layer of secure encryption to your website, so any information transferred by your website is encrypted. In this article we will explain how to obtain SSL certificates for your website on the WP Engine platform.
About HTTPS, TLS and SSL
HTTPS (Hypertext Transfer Protocol Secure) is the protocol for secure communication on the World Wide Web, and it prevents eavesdroppers from seeing information that visitors send or receive over the Internet. HTTPS secures its connections by using SSL/TLS, protocols that authenticate web servers and that encrypt messages sent between browsers and web servers.
TLS (Transport Layer Security) is a cryptographic protocol that provides secure communication over the Internet. HTTPS uses TLS to secure communication for website visitors. TLS provides the following security benefits:
- Identity authentication — The browser determines whether a web server is the right server, and not an imposter.
- Privacy — Information between the browser and web server is kept private by using encryption.
- Data integrity — Messages between the browser and the web server cannot be altered by others (e.g., during a man-in-the-middle attack).
SSL (Secure Sockets Layer) is the predecessor of TLS. After SSL 3.0, the next upgrade was named TLS 1.0 (instead of SSL 4.0) because the version upgrade was not interoperable with SSL 3.0. Many people refer to TLS as SSL (old habits die hard) or as SSL/TLS, even though all versions of SSL are technically now deprecated.
Review our guide for more information on which TLS versions are currently supported.
Check SSL Status
To determine if you have any SSL certificate installed on your website, visit your domain with https:// in front. The “s” in HTTPS stands for “secure”. For example: https://mycoolwebsite.com
- If you see a secure padlock next to the domain this means your site is secured by the SSL certificate. You can also click on this icon to view certificate details, such as expiration date and issuer.

- If you see a security warning, this means your site is not secured by SSL and you will need to add one.

- If the padlock next to your domain is broken, crossed out, or shows “more info”, this means your site is secured by SSL but there is mixed content on the page that needs correcting.

You can also test your SSL status with an external tool:
View in User Portal
To check if there is an SSL installed on WP Engine, visit the SSL page in the User Portal.
Note
(This does not apply to domains on our Advanced Network or Global Edge Security, which will have SSLs automatically installed through Cloudflare. For these domains the SSL status can be viewed from an environment’s Domains page)
- From the sites page Sites page, click the environment name
- Select “SSL”
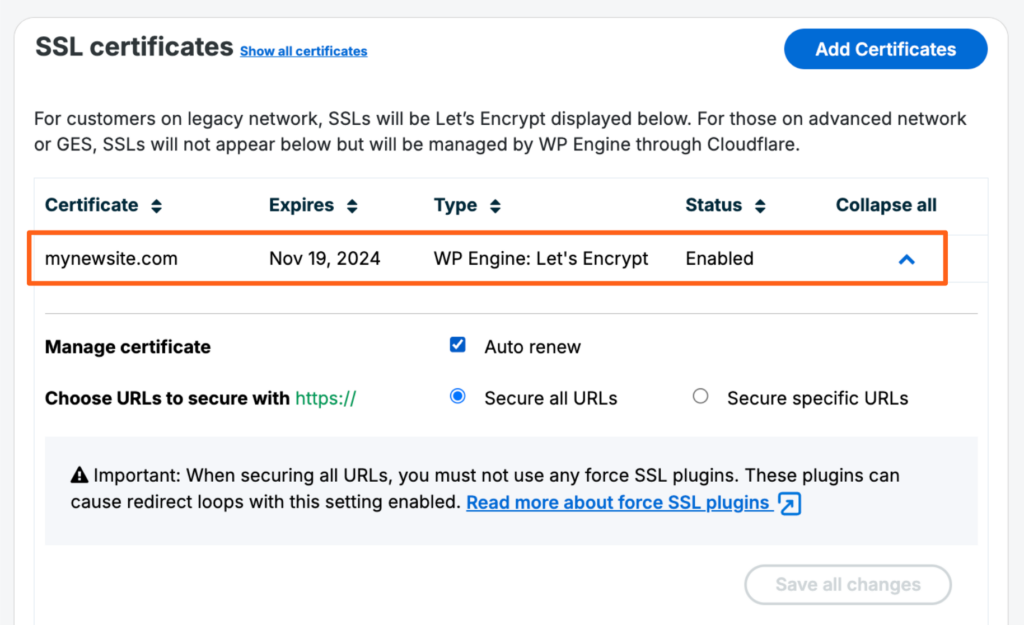
Let’s Encrypt and 3rd-party SSL certificates on this environment will display in the list, including issuer name and expiration date. Let’s Encrypt certificates will display the option to toggle “Auto renew” on or off, which allows or disallows the SSL to order again automatically prior to expiration. Auto renew defaults to “on” for Let’s Encrypt certificates.
Add SSL
When pointed to the Advanced Network or Global Edge Security, SSLs are installed automatically through Cloudflare so no SSL order is needed. If your DNS is pointed to our old Legacy Network or if you need to use a 3rd-party certificate you can add an SSL using the following steps.
Before adding an SSL, you’ll need to ensure that the domain(s) have been added to the User Portal. When using Let’s Encrypt, DNS should also be pointed to WP Engine.
To add an SSL to a website:
- From the Sites page, select the environment name
- Click SSL
- Click the Add Certificates button (You can skip this step if you don’t have any certificates yet because you’ll be automatically redirected to the Add Certificates page after clicking the SSL menu)

- Choose one of the 3 Add SSL certificate options:
- Follow the prompts to complete the request process
- When the SSL has completed installation, you will receive an email and the SSL options will become available
The process is automated from here. Our system will verify DNS has been pointed and install the certificate. SSL certificates typically install and activate within a few minutes, however in some cases can take up to 24 hours.
Auto Renewal
- All SSLs ordered through WP Engine default to Auto-Renew and Secure All URLs- this includes Let’s Encrypt, Advanced Network, and Global Edge Security SSL certificates.
- Third party certificates cannot auto-renew, as WP Engine is not the issuer we will not automatically have access to the updated SSL files. Third-party SSL certificates should be added as a new third-party SSL when renewal occurs.
Let’s Encrypt SSL Certificates
NOTE
Let’s Encrypt is only available for domains pointed to the legacy network. Domains pointed to Advanced Network or Global Edge Security will not have the option to add a Let’s Encrypt SSL through WP Engine because they already have SSLs automatically installed through Cloudflare.
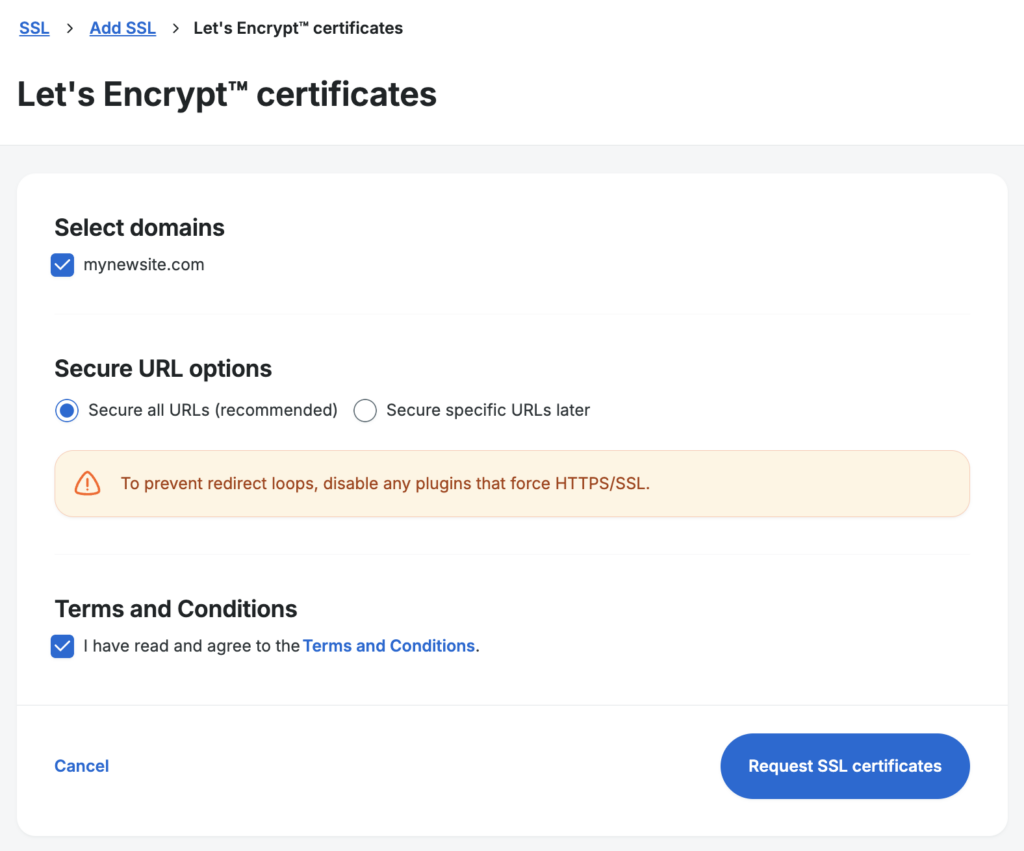
Let’s Encrypt SSLs are free SSLs that can be added to a domain if the domain is pointed to our old Legacy Network. To see your Let’s Encrypt SSLs:
- Go to the Sites page
- Click on the environment name
- Click SSL in the secondary lefthand menu
If you should, but do not see the WWW or non-WWW version of your domain listed here, be sure both variations are added to the User Portal. Each domain needs its own SSL certificate including subdomains like the WWW version of the domain.
To add a new Let’s Encrypt SSL follow the steps in the Add SSL section on this page.
Let’s Encrypt certificates expire after 90 days. Our system will attempt to auto-renew these 22 days before expiration if you leave the default “auto renew” option selected from the dropdown section for the cert on the SSL page.
Ordering a Let’s Encrypt certificate replaces any existing certificates on WP Engine for that domain (EX: 3rd-party certificate).
Import 3rd-Party SSL Certificate
WP Engine only provides free single-domain certificates at this time. Therefore the purchase and import of a 3rd-party SSL, purchased externally, may be necessary in a several situations:
- If you already have a valid SSL certificate you want to use
- If you need to use a wildcard SSL certificate
- If you need to use an Extended Validation (EV)
- If you need to use a Multi-Domain certificate (SAN)
Using a 3rd-party SSL also allows you to secure the domain prior to DNS being pointed to WP Engine. The domain should be added in the User Portal before installing the cert. The domain will not be secured with the SSL until you point DNS to your WP Engine server but if you want to test the SSL before pointing DNS you can Emulate DNS Locally with the Hosts File Trick.
To import any 3rd-party SSL successfully, a matching certificate and key file are required. If you generated a CSR through us then we already have the key file stored in our system. In some cases, there may also be additional intermediate certificates that you must provide. The Intermediate certs are also known as CA (Certificate Authority) certs. Sometimes SSL providers will give you the CA/Intermediate certs in the same file as the main certificate, and sometimes they’ll provide them in a separate file that is often named something like ‘ca-bundle’ (e.g. ca-bundle.crt). The main cert and the CA/Intermediate certs need to be uploaded or copy/pasted together when adding a 3rd-party cert in the User Portal.
Currently the same 3rd-party certificate cannot be used in more than one install when using the Advanced Network or the Global Edge Security Network (GES). If a 3rd-party certificate is needed for multiple installs, certificates should be created for each install.
There are a few other stipulations to be aware of:
- Third party SSLs can be added to the Legacy Network, Advanced Network, or Global Edge Security.
- Lite and Startup plans cannot have third party SSL certificates imported.
- On Shared WP Engine plans, only Production environments can have SSL installed.
- Third party certificates cannot auto-renew, as WP Engine is not the issuer we will not automatically have access to the updated SSL files. Third-party SSL certificates should be added as a new third-party SSL when renewal occurs.
Import Using Existing Certificate Files
If you already have both the SSL certificate and the matching private key file, use these steps. If you’re not sure if you have both matching files, proceed instead with the Generate a New Certificate Signing Request (CSR) steps below.
NOTE
Before importing a certificate, ensure that the domain(s) have been added to the User Portal.
- From the Sites page, select the environment name you wish to upload SSL files for
- Click SSL
- Click the Add Certificates button (You can skip this step if you don’t have any certificates yet because you’ll be automatically redirected to the Add Certificates page after clicking the SSL menu)
- Select Import certificate

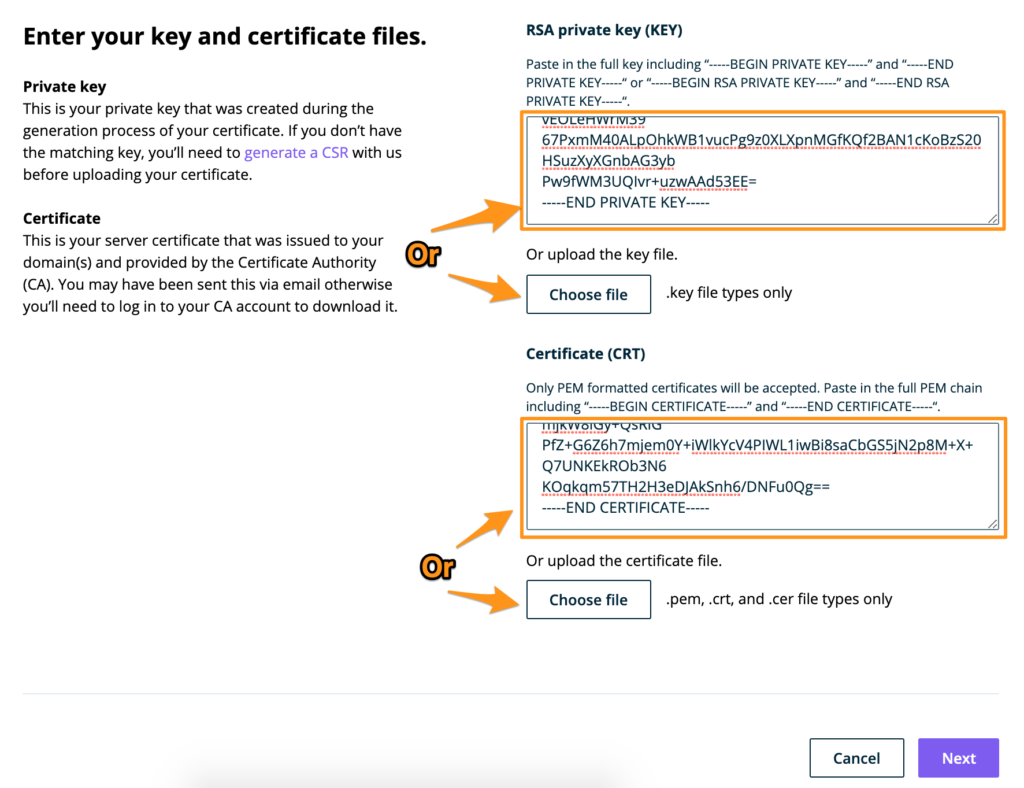
- Either copy and paste the contents of your existing certificate files into the fields, or select Upload the {key or certificate} file
- RSA private key (KEY)
- Paste in the full key including
-----BEGIN PRIVATE KEY-----and-----END PRIVATE KEY-----or-----BEGIN RSA PRIVATE KEY-----and-----END RSA PRIVATE KEY----- - If you choose to upload a file instead, key files must be RSA type keys with a
.keyfile type.
- Paste in the full key including
- Certificate (CRT)
- Only PEM formatted certificates will be accepted in this field. Paste in the full PEM chain including
-----BEGIN CERTIFICATE-----and-----END CERTIFICATE----- - If you choose to upload a file instead, certificate files must be PEM formatted with
.pem,.crt,or.cerfile types.
- Only PEM formatted certificates will be accepted in this field. Paste in the full PEM chain including
- RSA private key (KEY)
- Click Next
- Verify the certificate information is valid
- The correct domain(s) should be listed and selected
- The certificate validity date should be current, and not expired
- Click Next
- Choose HTTPS Preferences
- Secure All URLs (default) will force all URLs to HTTPS once the SSL has been successfully installed. For more information see Secure URL Options below.
- Click Upload Certificate
Your certificate and key file will then be reviewed, and if they match they will be installed and activated. If your files do not match, you will receive a notice and the SSL will not be installed or activated.
Generate New Certificate Signing Request (CSR)
This section will help you generate a CSR (Certificate Signing Request) and import your matching certificate file to WP Engine. Generate a CSR and follow these steps if you don’t have a certificate file, don’t have a key file or if you do not have a matching certificate and key file.
Remember, WP Engine needs both a key file and a certificate file that match each other to successfully install the SSL. If you generate a CSR through us then we will create and store the private key for you behind the scenes, so all you have to do is bring the CSR to your SSL provider when ordering the SSL and retrieve the matching certificate from the SSL issuer and provide it to us.
NOTE
Before generating a CSR, ensure that the domain(s) have been added to the User Portal.
- From the Sites page, select the environment name you wish to generate a CSR for
- Click SSL
- Click the Add Certificates button (You can skip this step if you don’t have any certificates yet because you’ll be automatically redirected to the Add Certificates page after clicking the SSL menu)
- Select Generate CSR
- Select the Certificate Type
- This should match the type of existing SSL that you will be importing
- Select the domain(s) the certificate was issued for when it was originally purchased
- Fill in the necessary Business Information
- Click Generate CSR
NOTE
Our system by default generates 256 bit CSR files, if you need a higher bit CSR reach out to our Support team.

- The next page will show your CSR file contents
- Confirm the information on the right side of the page is correct
- Use Click to copy or Download as .CSR to ensure you copy the full contents of your CSR correctly. The full CSR will include the following text at the top and bottom:
-----BEGIN CERTIFICATE REQUEST----------END CERTIFICATE REQUEST-----
We suggest leaving this page open in a separate tab or window so you can easily return to it later.
Request Certificate from Issuer
Once you have the CSR, you must provide it to your 3rd-party SSL certificate authority. The SSL certificate authority, or issuer, is the company from which you originally purchased the SSL certificate.
- Log in to your SSL issuer’s portal, or reach out to their Support team
- Request your SSL files for installation on another server, you may need to request that the SSL be re-keyed
- Provide the CSR file generated in the previous step to the issuer
- If the issuer asks for server type, choose Nginx
- Ensure the certificate is PEM formatted in the
.pem,.crt,or.cerfile type - Your SSL certificate issuer will return a newly generated SSL certificate file(s)
- There may be multiple files, be sure to save everything the issuer provides
- Copy or save any files provided to your local computer in a location where you can easily find them in the next step
- The full certificate contents will include the following text at the top and bottom:
-----BEGIN CERTIFICATE----------END CERTIFICATE-----
- The full certificate contents will include the following text at the top and bottom:
Upload Certificate to WP Engine
When you are ready to upload your certificate, return to the WP Engine User Portal.
- If you left the CSR page open previously, simply click Upload Certificate on the right.

- If you navigated away from the CSR page, the request can be managed again any time from the SSL page in your User Portal. Click the arrow next to a pending request to expand the options to Upload Certificate (CRT), View certificate signing request (CSR), or Delete and Revoke CSR. To upload a certificate, simply click Upload Certificate (CRT).

- Paste or upload any certificate files provided by the SSL issuer
- Click Next
- The file will automatically be compared to the CSR for a match. You will be taken to the next page if the files match.
- If the CSR and the CRT do not match, you will see the message:
This certificate did not match the CSR. You will need to copy the CSR again and repeat the steps to retrieve any certificate files from your SSL issuer.
- Verify the certificate information is valid
- The correct domain(s) should be listed and selected
- The certificate validity date should be current, and not expired
- Click Next
- Choose HTTPS Preferences
- Secure All URLs (default) will force all URLs to HTTPS once the SSL has been successfully installed. For more information see Secure URL Options below.
- Click Upload Certificate
Potential SSL Issues
When requesting, installing or activating SSL, it is possible to run into issues. If you experience issues with your SSL, WP Engine Support is available 24x7x365 to assist and we’ve provided some additional troubleshooting information below.
Let’s Encrypt SSL Not Issuing
If the Let’s Encrypt SSL status is “pending” this may resolve itself automatically within a few minutes, however if it does not, please check the items below. If your SSL request fails to process, a Support ticket will be generated titled “Certificate Domain Validation Error” or “Certificate Authority Error.”
- Is DNS pointed to WP Engine and fully propagated? Learn how to point DNS here.
- Remove any AAAA (IPv6) records on the top-level domain. (Except when using Cloudflare.)
- Remove any conflicting CAA (certificate authority authorization) records. These limit which providers can issue SSL for the domain.
- Let’s Encrypt does not issue certificates for high-risk domain names—those that resemble well-known banks or brands (EX:
wellsfargo.worldorcocacola.info) or for sites that Google tags as unsafe. - Ensure the domain is not being redirected to another domain.
- If the domain has a firewall in place, grant an exception for Let’s Encrypt or disable the firewall. (Bear in mind, Let’s Encrypt certificates are issued for 90 days periods. Adding an exception is preferred so the issue does not occur again at the next renewal.)
- Use Let’s Encrypt debug tool for more information here: https://letsdebug.net/
Corrected some of these issues and need to restart a pending SSL order? Reach out to our Support team.
Third-Party SSL Upload Failure
If a third-party SSL status is pending, the certificate files still need to be uploaded. Refer to the installation process here for more information.
If a third-party SSL failed to upload, this is either because the certificate and key files do not match or the files are in the wrong format. If the key and the crt do not match, the third-party SSL upload will continue to fail.
To troubleshoot a third-party upload error, try the following:
- Ensure the domain(s) on the SSL certificate match the exact domain(s) added to the Domains page of the User Portal.
- Generate a new CSR. Even if you already have a certificate and key file- if these are not uploading, our system does not detect a match. Using a CSR will store the matching key on WP Engine. Be sure this new CSR file is provided to your SSL issuer and that it is used to generate a matching certificate file. Be sure to upload this new matching certificate file back to WP Engine.
- Copy or upload the file contents exactly as provided by the SSL issuer. The contents should begin with a hyphenated line, like
-----BEGIN CERTIFICATE-----, and end with a hyphenated line, like-----END CERTIFICATE----- - Only certificate files that are PEM formatted with
.pem,.crt,or.cerfile types can be used. - Only key files that are RSA formatted with the .
keyfile type can be used. - If requested, the SSL certificate should be issued for the Nginx server type.
- Invalid CSR – If this error occurs, the SSL import should be started again by generating a new CSR. See the CSR steps here.
If you have your certificate and key files but would like assistance installing them, please upload the files into the _wpeprivate directory using SFTP or SSH Gateway, then reach out to our Support team.
Cloudflare
If you are using Cloudflare, you will also need to configure SSL settings in their dashboard. Read more here about configuring SSL when using Cloudflare.
SSL/TLS certificate warnings for Internet Explorer on Windows XP
WP Engine uses Server Name Indication (SNI) for SSL/TLS certificates. SNI provides an efficient way to configure certificates, and it works well with most browsers. However, visitors that use Internet Explorer on Windows XP may see the following error. It’s best to use an alternate up-to-date browser.
Sucuri WAF
Sucuri’s firewall service may prevent your SSL from processing, due to an additional DNS layer. Please contact the Sucuri team directly to request enabling the Forward Certificate Validation to Hosting option. This will allow your Let’s Encrypt certificate request to process normally.
Mixed Content
Mixed content is media or other links on pages within your website that are not properly secured by SSL. These links use http instead of https when loaded onto the page and will cause an insecure warning on some parts of a website. Mixed content is typically simple to correct, see our correcting mixed content guide for more information.
Copy or Restore SSL
SSL files are not stored in site backups. This means SSL is not impacted by copy or restore processes.
- SSL is not included when copying a site. On the destination environment, the SSL should be reordered (Let’s Encrypt) or added as a new certificate (third party SSLs).
- Restoring the site to an earlier version will not alter the SSL.
NOTE: SSL is included when migrating a site to another server.
Remove SSL
At this time WP Engine customers cannot remove SSL certificates on their own. Please reach out to WP Engine Support for assistance deleting the SSL certificate.
Secure URL Options
NOTE
When using Advanced Network or Global Edge Security, SSL is forced and all URLs will redirect to HTTPS by default.
When using Let’s Encrypt or third-party SSL, SSL may also need to be forced. To see the force SSL options, navigate to the SSL page, then click on the certificate to expand the options. The option “Secure all URLs” is selected by default.
The “Secure all URLs” option forces all pages to automatically serve requests secured with SSL over HTTPS. When using this option do not use any additional force SSL/HTTPS plugins.
The “Secure Specific URLs” option uses RegEx to ensure only the defined URLs are forced to use SSL and HTTPS.

Force SSL Plugins
Force SSL plugins can cause redirect loops when their settings conflict with the settings on the SSL dashboard. We recommend that you leverage the settings that we provide in the SSL dashboard as they work server side and have been tested extensively with our platform. Using settings directly at a server level keeps the force SSL functionality on Nginx, making it faster and more effective.
How do I know if I use a force SSL plugin?
It’s possible for plugins not specifically dealing with security to to include such a setting. For example, WooCommerce offers an option to force the use of SSL. In general, to find plugins that could be forcing https usage on your website:
- Log into your site’s WordPress Admin
- Visit the Plugin page
- Look for any plugin that mentions Securing Pages, HTTPS, or SSL
Common Force SSL Plugins
- Force SSL
- WP Force SSL
- WordPress HTTPS
- Verve SSL
- Really Simple SSL
- Easy HTTPS Redirection
NEXT STEP: How to fix mixed content errors