Running a GKE application on spot nodes with on-demand nodes as fallback

Anna Muscarella
Cloud Infrastructure Engineer, Google Cloud Professional Services
Spot VMs are the latest version of preemptible VM instances. Preemptible VMs continue to be supported for new and existing VMs, and preemptible VMs now use the same pricing model as Spot VMs. However, Spot VMs provide new features that are not supported for preemptible VMs. For example, preemptible VMs can only run for up to 24 hours at a time, but Spot VMs do not have a maximum runtime. The following article will only cover spot instances for simplicity. This solution is valid for preemptible machines as well.
Spot VMs are great for saving costs. Usually, these are idle server machines in GCP which are not being used at the moment, so they are offered for a significant discount.
However, spot instances can get shut down and taken away from your application at any time within a 30s notice period. If another customer needs these instances and they are paying on-demand price for it, the machine will be allocated to that customer.
Fortunately, Kubernetes takes care of rescheduling pods to different nodes when a node is shut down. And as soon as one node breaks away, GKE will automatically provision a new one.
What if there are no spot instances available of the particular machine type your application needs?
At times (for example Black Friday), there can be a lot of demand for a particular instance type, resulting in that instance type no longer being available as a spot instance. In that case, your application would simply not be available, if it was running on spot instances only.
In general, running applications on spot instances requires a particular type of application:
it needs to handle being interrupted at any time.
it needs to be tolerating downtimes due to unavailable resources.
One example of this application type is a job processing data from a messaging queue. The application can be down for a while and messages will be kept in the queue until the app is running again.
But what if you have a stateless application that can deal with nodes being terminated on short notice, but you always want your application to be available?
Let’s look at how you might design such an architecture.
Adding an on-demand backup node pool
To leverage spot instances and still ensure your application is always up and running, consider creating a backup node pool with on-demand instances.


The setup above leads to the Kubernetes scheduler distributing your pods between both node pools. In case there are no spot instances available, your application would still run on the on-demand pool.
On the downside, your costs would increase significantly, since 50% of your workloads are now running on on-demand instances.
Adding scheduling preferences with NodeAffinity
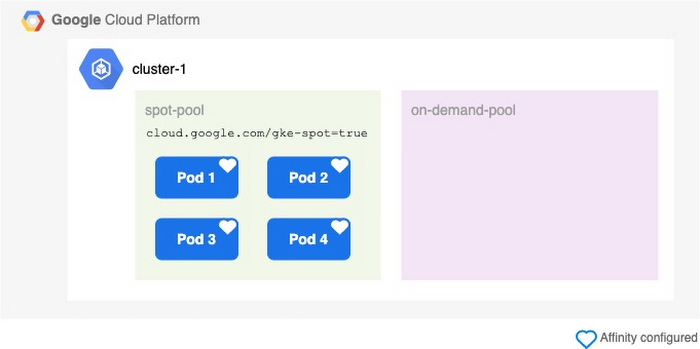
Ideally, the pods should run in the spot pool if possible, and only be scheduled to the on-demand pool, if there is not enough capacity in the spot instance pool.


That’s where NodeAffinity and Taints/Tolerations come in. NodeAffinity allows you to give your pods preferences on which nodes they should be scheduled to. These preferences can be a hard constraint or soft preference: A hard constraint basically means to “ONLY schedule pods on a node with label XYZ”, while a soft preference means “TRY to schedule pods on a node with label XYZ”. The cluster autoscaler and node auto provisioning will try to honor soft preferences, but will ignore them if they cannot be honored.
Hard constraints serve the same functionality as nodeSelector, however, NodeAffinity provides a more expressive language.
In this case, the soft preference preferredDuringSchedulingIgnoredDuringExecution is the right choice to instruct the pods to preferably use the spot node pool:
Conveniently, all nodes of type spot instance within GKE automatically get the label cloud.google.com/gke-spot=true assigned. This means you won’t have to manually label all spot nodes.
NodeAffinity allows for several rules - if you are using multiple, you can set the weight according to the order in which the scheduling preferences should be followed.
With the affinity property added to your deployment YAMLs, your nodes will now only schedule within the on-demand pool, if there are no sufficient spot resources available.
Adding Taints and Tolerations
While the pods are now being scheduled the correct way, it’s a good practice to explicitly declare which nodes to avoid as well.


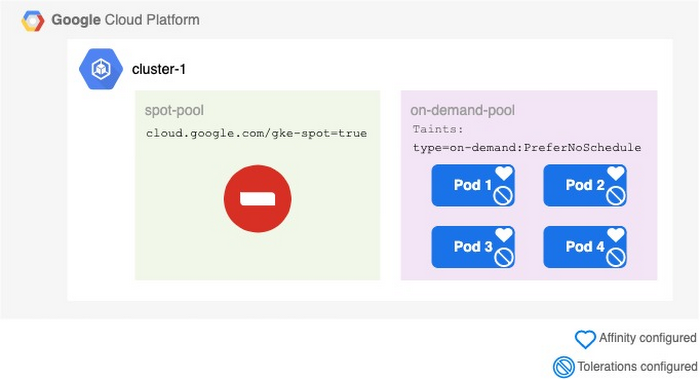
The opposites of NodeAffinity are Taints and Tolerations. Taints have to be added to nodes (similar to labels) whilst Tolerations are placed on the pods. For example, a Taint type=on-demand can be added to the on-demand pool:
All pods with NodeAffinity and Tolerations set will now try to schedule on spot instances, if possible. Again, only either NodeAffinity or Tolerations are required, but it’s always good to specify both to avoid corner use cases.
Schedule pods back to spot
Careful: ensure you have PodDisruptionBudgets configured, before trying this in production (see below)
Imagine Black Friday is over, you got a lot of fantastic deals and come back to work to see that all your pods are running within the on-demand pool instead of the spot pool. During Black Friday, the big shopping websites soaked up all spot instances your application was using. Luckily, your setup worked and now everything is running on on-demand.
Why didn’t the pods schedule back to spot instances, now that they are available again?


Unfortunately, NodeAffinity and Taints are only respected during the scheduling of pods. As soon as they are scheduled on to a node, the Kubernetes scheduler will not consider the pod’s preferences anymore.
The solution to the problem is simple: force your pods to be scheduled again.
You can use a simple bash script to drain all nodes within the on-demand pool, which will destroy the pods and the Kubernetes scheduler will re-schedule them while respecting their preferences. To avoid system-relevant pods to be drained from the on-demand nodes as well and potentially killing your cluster, make sure to use the drain command with a filter applying to only your application’s pods:
kubectl drain $NODE_NAME --pod-selector=$APP_LABEL --delete-emptydir-data
For example, for a spec with metadata.labels.app: my-app you would use the filter --pod-selector=my-app.
The following script helps to drain all nodes from pods belonging to specific apps and then uncordons the nodes to make sure they are available again:
Draining a node results in the node being cordoned, meaning being marked as unschedulable and unavailable. During the process of draining the pods, all on-demand nodes should remain cordoned to avoid the pods being scheduled back to the on-demand nodes. Otherwise, the Kubernetes Autoscaler might decide to schedule the pod on-demand again, If there is sufficient capacity available within an on-demand pool and new nodes have to be spun up in the spot pool.
Since there are not enough nodes available in both pools (due to the on-demand nodes being cordoned), the GKE Autoscaler will pick the cheapest machine to scale up, which is a spot machine in this case.
Once all pods are drained, make sure to mark the nodes as available again so they can be reused, if required. However, they will be shut down by GKE if all application pods were successfully moved to the spot pool, since the on-demand nodes will not have sufficient workload to keep running.
Consider running a drain job e.g. every night to make sure pods are moved back to spot. Even if the job runs and no spot instances are available, the GKE Autoscaler will just provision new on-demand nodes, and remove the drained nodes afterwards.
Configure a PodDisruptionBudget
With the current setup, all pods will eventually move back to the spot instances, which is great. However, it can result in your application being temporarily unavailable.
Depending on your application, stopping pods can be a very quick process, while starting up pods may take much longer, as the node-pool might need to scale up to accommodate the new pods.
This can result in your application being temporarily unavailable, because all on-demand nodes have been drained, and the pods have not yet finished starting on spot nodes again.
To avoid this scenario, configure PodDisruptionBudgets (PDB) if you haven’t done so already. This is considered best practice anyways, as it also helps you to ensure availability of your application during a planned maintenance.
PodDisruptionBudgets limit the number of concurrent disruptions that your application experiences, meaning you can specify how many pods should be allowed to be unavailable at the same time.
The following PodDisruptionBudget only allows 1 pod to be unavailable at the same time during a “planned” disruption:
Things to keep in mind
In the Black Friday scenario described above, it could happen that all spot instances become unavailable at around the same time.
Your application only has 30s from receiving the SIGTERM signal until the node is being shut down. In those 30s, the pods running on spot VMs have to be shut down, a new node has to be spun up in the on-demand pool, and the pods have to be restarted on the new node.
Especially spinning up a new node takes some time, which means your application might experience temporary performance issues in this scenario. To avoid that, consider having sufficient instances available on standby within the on-demand pool. Of course, this also increases your cost.
This trade-off is something you have to consider in advance and test thoroughly, to find the perfect balance between spot and on-demand nodes for your application’s use case.
Another thing to keep in mind is to double the maximum available/allowed CPU requirement for your project. In case of scheduling the pods from the on-demand pool back to spot, double the amount of machines will be running temporarily.
Try it out
You can use the Terraform script at https://github.com/GoogleCloudPlatform/professional-services/tree/main/examples/gke-ha-setup-using-spot-vms to try this yourself.
To simulate spot VMs being unavailable and forcing the application to run on the fallback pool, first disable auto scaling and then scale the spot node pool down to 0 nodes.
Disable auto scaling for the spot node pool:
gcloud container clusters update "${YOUR_GCP_PROJECT_ID}-gke" --no-enable-autoscaling --node-pool=spot-node-pool --zone=europe-west1-b
Scale the spot-node-pool to 0 nodes:
gcloud container clusters resize "${YOUR_GCP_PROJECT_ID}-gke" --node-pool=spot-node-pool --num-nodes=0 --zone=europe-west1-b
Now simulate spot VMs being available again by enabling auto scaling again:
gcloud container clusters update "${YOUR_GCP_PROJECT_ID}-gke" --enable-autoscaling --node-pool=spot-node-pool --min-nodes=1 --max-nodes=3 --zone=europe-west1-b
Wait for the drain-job to drain the on-demand nodes and watch your pods being scheduled back to the spot nodes. The drain-job is configured to run every 15 minutes, so this might take a while.
Note: in this example, the drain job runs every 15 minutes for demonstration purposes. Depending on your application requirements, running it once or twice a day is sufficient.


