Skip to content
Old versus new

The Unistellar Odyssey smart telescope made me question what stargazing means

The age-old pursuit of looking at the heavens is finally getting an upgrade.

Tim Stevens
Two telescopes on a forest path
The Sky-Watcher HEQ5 Pro and the Unistellar Odyssey Pro. Credit: Tim Stevens

It's been 300 years since Galileo and Isaac Newton started fiddling around with lenses and parabolic mirrors to get a better look at the heavens. But if you look at many of the best amateur telescopes today, you'd be forgiven for thinking they haven't progressed much since.

Though components have certainly improved, the basic combination of mirrors and lenses is more or less the same. Even the most advanced "smart" mounts that hold them rely on technology that hasn't progressed in 30 years.

Compared to the radical reinvention that even the humble telephone has received, it's sad that telescope tech has largely been left behind. But that is finally changing. Companies like Unistellar and Vaonis are pioneering a new generation of scopes that throw classic astronomy norms and concepts out the window in favor of a seamless setup and remarkable image quality.

But is it really stargazing if you're looking down at your smartphone instead of up at the stars? That's what I endeavored to find out with the help of two generations of "smart" telescopes, one old and one new, brought together during the recent solar eclipse.

Old versus new

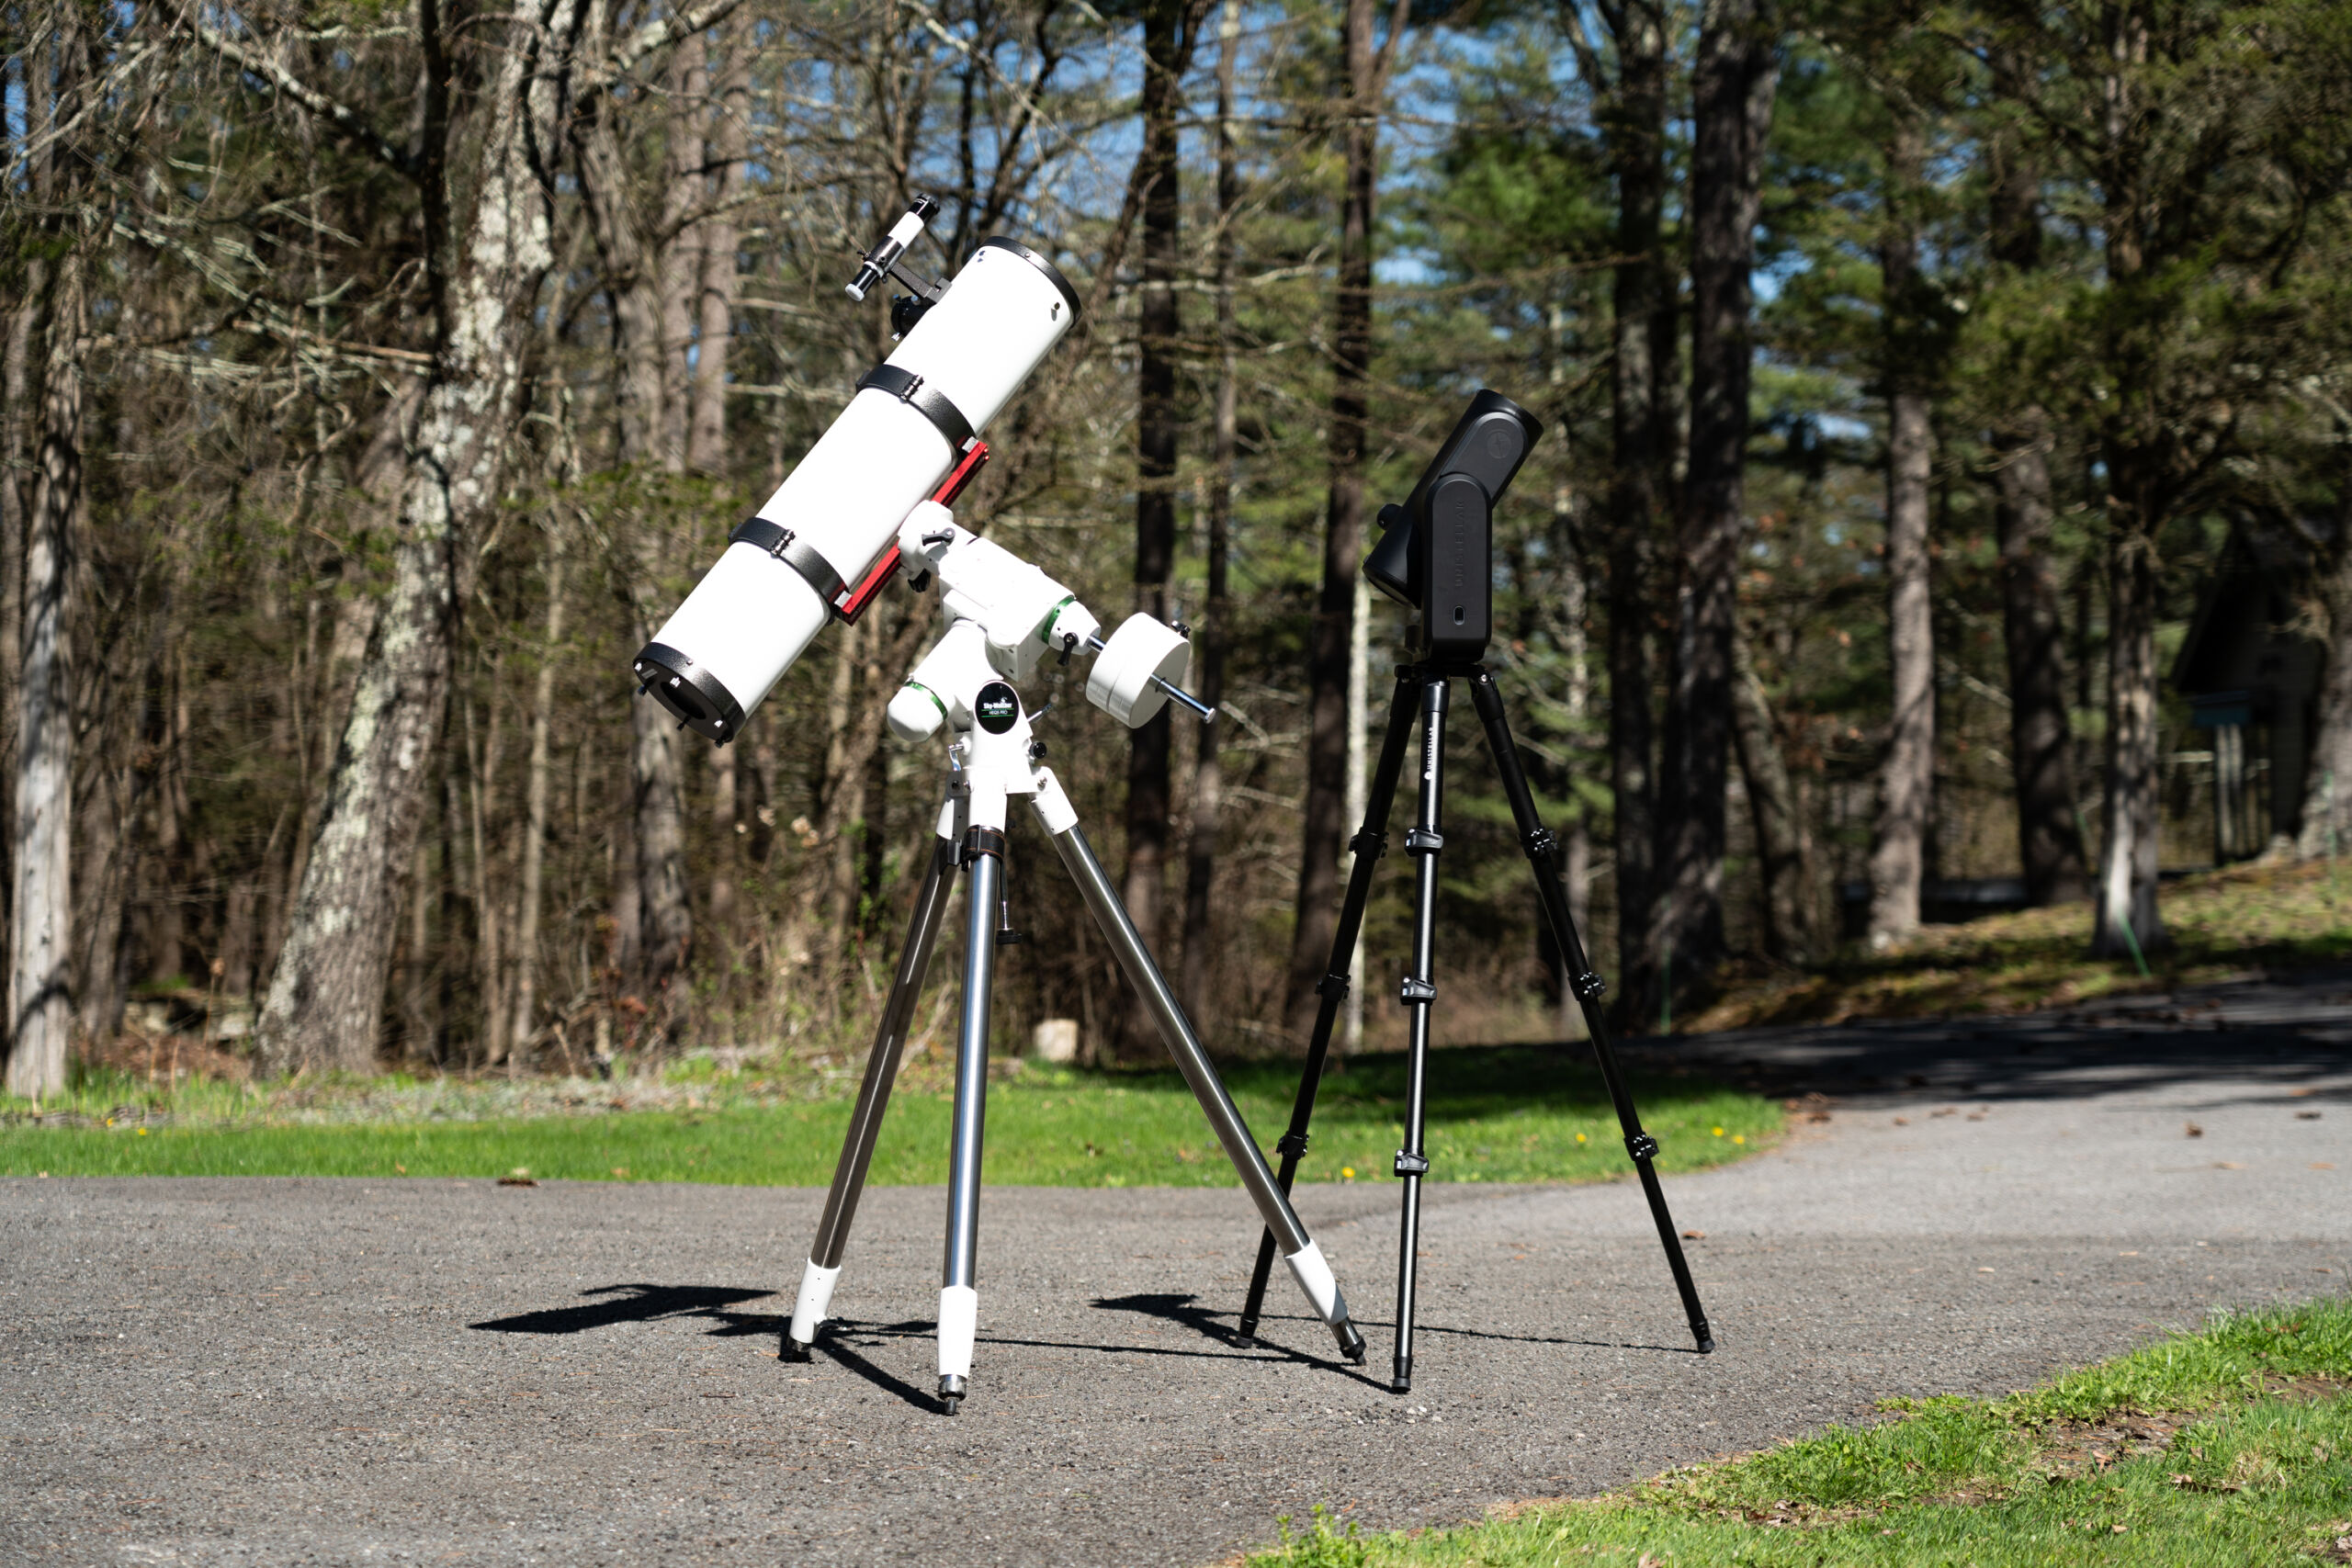
In the "old" corner is my GSO six-inch, a Newtonian reflector with a few upgrades. It's a basic scope, on the high-end of entry-level by amateur astronomer standards, but a solid base for learning. Besides, the real money is in the mount and eyepieces. For eyepieces, I tested using a Baader Hyperion Zoom Mark IV and a Hyperion 5 mm.

The bulk of the cost of this setup, though, is in the mount, a Sky-Watcher HEQ5 Pro. This is among the more advanced of the classic style of "smart" telescopes, an equatorial mount that, once correctly aligned (more on that in a moment), can find celestial objects and track them across the sky using a device called a SynScan 6.

A telescope in a field
The Sky-Watcher HEQ5 Pro.
The Sky-Watcher HEQ5 Pro. Credit: Tim Stevens

The SynScan and the Sky-Watcher use a technology broadly called "GoTo," a general term for a mount that can find celestial objects in the sky. These scopes first appeared in the late 1980s, and they've seen little progress since.

To find those celestial objects, you'll generally need to know their Messier (M) or New General Catalogue (NGC) numbers, and you put them into a handheld controller that offers all the finesse of a Speak & Spell. (SynScan does make a smartphone app, but it replicates the same user experience, earning it two-star ratings on both the Apple App Store and Google Play Store.)

The total cost for a setup like this? About $2,500.

That's a significant investment, but it's mighty affordable compared to the $3,999 Unistellar Odyssey Pro. For that, you get a disconcertingly small telescope, a positively rudimentary-looking tripod mount, and not much else.

But if cost is an object (as it most certainly is for me), you will probably want to buy the $2,499 Unistellar Odyssey instead. Ditching the Pro designation saves you $1,500 and only costs you one feature: an eyepiece on the side, which you probably don't want anyway.

How do you use a telescope with no eyepiece? That's where this all starts to get complicated.

What are you looking at?

Though the Unistellar scope conceptually uses a traditional Newtonian reflector setup just like my GSO scope, instead of directing light toward an eyepiece, it focuses it onto a 8.4-megapixel sensor. Yes, that sounds disappointingly low-res when today's base iPhone 15 has 5 times the resolution.

But when it comes to low-light performance, lower resolution is often better. Fewer pixels for a given size sensor mean bigger pixels, each capable of capturing more light with less noise. Those iPhone pixels measure 1.0 µm, while the pixels on the Unistellar are 1.45 µm. But, the scope can actually go even further, pixel binning down to just two megapixels but increasing the effective pixel size to 2.9µm.

The image that bathes that sensor is then sent wirelessly to a tablet or smartphone over the scope's Wi-Fi network. From there, you can change all sorts of parameters, including exposure length and brightness, and thanks to the recent update, you can even download raw image data for further processing later.

An Enhanced Vision mode allows the scope to do a sort of smart rolling exposure, stacking multiple images to create astonishingly clear, detailed photos of tiny interstellar objects. The images you get from this little scope are surprisingly good.

Now, back to that eyepiece. If you spend $3,999 for the Odyssey Pro scope with the eyepiece, you're still not getting a direct look at the stars. Instead, you're just squinting at a little side-mounted OLED screen. That display shows exactly what you see through the app. In fact, if you pinch-zoom in on the phone, you'll get the same zoomed perspective through the eyepiece. It's little more than a vestigial appendage, and it's not worth the extra cost.

An iPhone app screenshot showing telescope settings
The app for the Unistellar Odyssey Pro.
An iPhone app screenshot showing information on specific galaxies
The app also serves as a guide to the things you can explore.

GoTo hell vs. Unistellar heaven

Setting up my GSO scope and Sky-Watcher mount is always an epic test of patience, one typically suffered late at night while slowly succumbing to hypothermia.

To begin, you have to lug the contraption to where you want it. The combined weight of the mount and scope is 60 pounds, and the telescope's design is cumbersome. The scope is simply impossible to pick up and carry comfortably.

Once the telescope is in place and leveled, you need to figure out your latitude and longitude, made much easier these days by smartphones. Configuring the mount to the right digits requires turning a series of metal screws, which is very unpleasant when you have freezing fingers.

You must then point the axis of the scope toward Polaris, the north star, which is hopefully not obscured by trees or the like. Polaris must be perfectly positioned within the mount's integrated spotting scope, and you turn the screws to make adjustments.

You then need to begin the digital alignment, which entails picking three stars out of the sky and manually centering the scope on each. If you can identify the three named stars by sight, this process is relatively easy. If not, you'll be stuck reaching for your smartphone, probably blowing your night vision in the process.

When I was a rookie, my first few attempts to do all this took multiple hours. With enough practice and a willing helper, it can probably be done in as little as 10 minutes. But take a season or two off from stargazing and it's easy to forget the details.

In my pre-eclipse testing, when I was getting reacquainted with the scope, it took me 52 minutes of shivering and swearing to get everything pointed the right way.

The second time I used the Unistellar scope, it was 2 minutes and 30 seconds between my removing it from the box and capturing a (beautifully crisp) picture of the Moon. That's 150 seconds versus 52 minutes.

Admittedly, the first time took longer with the Odyssey Pro, but that was mostly because I had a firmware update to apply and an app to install. I also needed to go through a little calibration routine and tutorial. Even then, I was gazing within 10 minutes.

Setup for the Unistellar goes like this: Extend the tripod legs, plunk the scope on the tripod in any orientation you like, level everything, and then hit the power button. The scope uses your phone's GPS to get its initial bearings and then spends 30 seconds or so looking around the night sky to orient itself. After that, you just scroll through an auto-updating list of whatever's overhead, tap the celestial object that sounds coolest, and watch as the scope brings it to your phone.

The Unistellar weighs just 13.5 pounds with its mount, so it's easy to carry one-handed. It has a five-hour battery, and you don't even need to be outside to use it. I got some lovely shots of the Moon from my kitchen. Only the scope stood out in the cold.

Pre-game testing

Unistellar shipped me the Odyssey Pro loaner you see here in time to capture the April 8 total solar eclipse, including the optional $199 solar filter that cleverly pops on with magnets.

In the days and evenings ahead of the event, I set up both scopes repeatedly to compare the ease of setup and the quality of viewing. When it comes to ease of setup, again, there's no contest. The Unistellar wins every time.

But things get a little more nuanced when it comes to viewing. Looking at the live feed out of Unistellar is good, but when you let it start stacking images, it gets amazing.

The cigar galaxy, for example, is but a little smudge through my scope at maximum magnification. On the Unistellar Odyssey Pro, it was impressively defined. Other clusters and objects are similarly breathtaking, so good that I was left fearing some Samsung Moon Gate-style processing shenanigans.

The moon moves in front of a vibrant sun
The eclipse as seen through the Odyssey Pro.
Solar flares around the eclipse
Activity is visible on the edge near totality.
The porous surface of the moon
Here's the Moon in another moment, with clear details visible.
A galaxy in a starfield
And a distant galaxy.

I couldn't help being skeptical, so I went to the source, Unistellar CEO and cofounder Laurent Marfisi.

"The only telescope input is the signal it detects from the sky while you are observing," he told me. He said the scope does some filtering and image processing, including applying proprietary noise reduction tech the company calls "Deep Dark Technology." But the image data comes only from what the scope itself captures.

Still, I couldn't shake the feeling that there's some sort of augmentation going on here. Pictures of the sun, for example, are brilliantly warm, whereas if you hold the filter up and look through it, the coloration is nowhere near that rich.

I asked Marfisi about this as well. "Any camera sensor, consumer or professional camera, without extensive work on signal processing, would spit out a heavily distorted image in terms of colors," he said. "A 'real' looking image is always the result of complex work on image processing, white balance and more, that allows images to be overall and consistently similar to reality in terms of colors, regardless of lighting conditions."

That might seem to indicate some saturation boosting is at play, but even NASA does that.

Eclipse time

On the day of the eclipse, with the help of my family, I set up both our scope and the Odyssey Pro. As ever, the Unistellar was up and running nearly instantly. For daytime use, you simply position it with the scope's arm off to the right when facing the sun and then drop the solar filter in place. It took just a few seconds to find the sun. Hours later, the sun was still perfectly centered.

The Sky-Watcher mount was far trickier. Remember, setup depends on pointing it at Polaris, which is invisible during the day. We had to eyeball it, and we didn't do a particularly good job, so the sun started wandering out of frame every 10 minutes or so, requiring constant manual correction.

Everyone at the family gathering asked about the Unistellar, marveling at the pictures on my phone. When I told them they could all install the app themselves and get a direct feed and even capture their own pictures, plenty reached for their phones. The Unistellar supports up to 10 connections simultaneously, with one operator issuing commands and up to nine others streaming the result.

As the Moon ate the sun, I bounced back and forth between scope and app. There was an odd perception of depth through the GSO scope and Baader eyepiece that's lacking in the Unistellar. Viewing the event through the scope was breathtaking. But being able to easily track and photograph everything on the Unistellar made me glad to have it. And battery life proved not to be an issue. Though it disconcertingly dropped from 100 to 80 percent in just 30 minutes, it stayed at 80 for the next few hours.

Picking a winner

It's important to note that if I were to mount a camera on my scope and take the requisite series of images, then digitally stack and process them in photo editing software, I could almost certainly get even better results from my 6-inch scope than you see here from the Odyssey Pro.

But I've spent enough time struggling with astrophotography in the past to know that's adding yet another layer of headaches to an already complicated process. Plus, doing it that way means you're even farther from the experience. You don't get usable images until hours later.

Though it's fully digital, the Odyssey Pro gives you immediate feedback and remarkable images in minutes. It's an interesting blend: The power of modern astrophotography plus the immediacy of traditional stargazing.

For a younger crowd and anyone who lives less for the vibes and more for the 'Gram, the Unistellar Odyssey is the ultimate scope. It's so delightfully easy to use that even children can join in on stargazing. And there's no need to take turns squinting down an eyepiece; everyone can smile around an iPad.

But for older enthusiasts, especially those who have grown up with traditional scopes, the Odyssey is a harder sell. My wife put it quite succinctly: "I struggled to connect with the Unistellar telescope. Yeah, it was a better picture, but it didn't feel real."

The most striking endorsement of the classic telescope was something unsaid. As the Moon crept across the sun, sweeping my family and myself into totality, everyone crowded around the GSO telescope to take their turn. Despite the Unistellar providing an astonishing glimpse at a solar prominence off the southern pole of the sun, nobody was looking at the app. They wanted to squint down that eyepiece or just gaze upward in wonder.

No matter how impressive the Odyssey Pro is, there's just something about actually looking at a thing, not a picture of a thing.

Listing image: Tim Stevens

Prev story
Next story